<?xml version="1.0" encoding="utf-8"?><feed xmlns="http://www.w3.org/2005/Atom" ><generator uri="https://jekyllrb.com/" version="3.10.0">Jekyll</generator><link href="/feed.xml" rel="self" type="application/atom+xml" /><link href="/" rel="alternate" type="text/html" /><updated>2025-06-24T13:52:41+00:00</updated><id>/feed.xml</id><title type="html">ahrm’s blog</title><subtitle>Computers, Machine Learning and non-machine learning</subtitle><entry><title type="html">Google AI previews helped me in Iran’s internet shutdown of 2025</title><link href="/jekyll/update/2025/06/20/iran-internet-2025.html" rel="alternate" type="text/html" title="Google AI previews helped me in Iran’s internet shutdown of 2025" /><published>2025-06-20T11:15:21+00:00</published><updated>2025-06-20T11:15:21+00:00</updated><id>/jekyll/update/2025/06/20/iran-internet-2025</id><content type="html" xml:base="/jekyll/update/2025/06/20/iran-internet-2025.html"><![CDATA[<!-- small font -->

<p><span style="font-size: 0.6em; color: gray;">Disclaimer: Most of this post was written Jun 20th, 2025, but some links and images were added later.</span></p>

<p>Today that I am typing these words is Friday, Jun 20th, 2025 though in all likelihood it is not the date that they will be published. Almost exactly a week ago <a href="https://en.wikipedia.org/wiki/Iran%E2%80%93Israel_war">Israel attacked Iran</a>, igniting the 40-year old cold-war between the two nations. This is probably the most serious existential threat to the Islamic Republic since its inception in 1979. In trying times like these, the Islamic Republic shows that it truly believes in something, something that has always saved them in the direst situations and always protected them from the most formidable adversaries. Yes: I am, of course, talking about internet censorship.</p>

<p>To understand what the internet in Iran is like now, let me first paint you the picture of the internet in “normal” times: All non-state affiliated news networks are blocked. All blogger/wordpress weblogs are blocked. All messenger apps like telegram or whatsapp are blocked (whatsapp was briefly unblocked for a few months but it is blocked again now). Facebook, twitter, youtube, twitch, reddit, instagram, tiktok, feedly, discord are blocked.</p>

<p>What is not blocked you ask? Well most google services are not blocked (e.g. search, gmail, maps). Though our friends in silicon valley sure try to make us feel at home:</p>

<hr />

<p align="center">
  <img src="/images/2025-06-20-iran-internet/403.png" />
</p>
<hr />

<p></p>

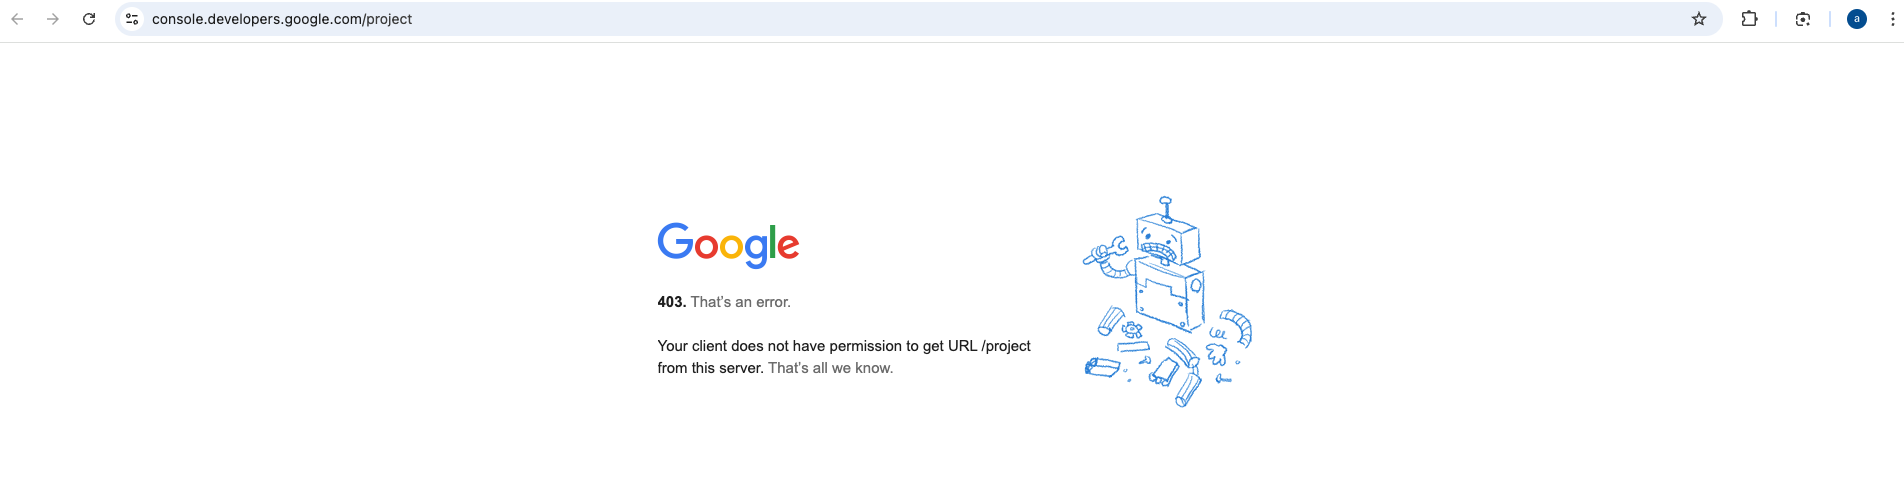
<p>This is what you see when you try to enter google developer console with an Iranian IP address. It is not blocked from Iran’s side but it is unavailable due to sanctions (that’s all you know? I bet you know a little more than that!). Chatgpt? 403. Google AI Studio? 403. Most online videogames? 403. Android developer documentation (for fuck’s sake)? 403.</p>

<p>Now you might say such an internet is completely unusable. And you would be correct. That’s why <a href="https://iranwire.com/en/news/139360-survey-half-of-iranian-internet-users-expect-no-censorship-relief-under-pezeshkian/">81% of Iranians use VPNs to access the free internet</a> (and remember, this is a survey conducted by Iranian Parliament Research Center in a country where VPNs are technically illegal, so the actual number might be much higher than this).</p>

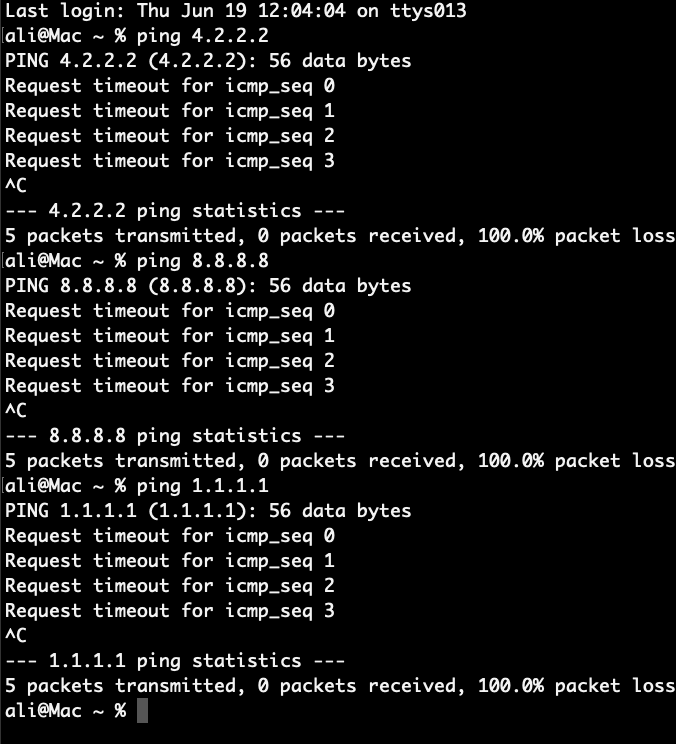
<p>So that was the internet in peace time. How does the internet look like in the war time where access to the information is most vital? Well, it appears that the regime has <a href="https://mastodon.social/@netblocks/114707474965101732">completely shut off Iran from the rest of the world</a>. No incoming or outgoing traffic can cross the borders.</p>

<hr />

<p align="center">
  <img src="/images/2025-06-20-iran-internet/noping.png" width="50%" />
</p>
<hr />

<p></p>

<p>Their excuse for doing so are the following:</p>

<ul>
  <li><a href="https://www.reuters.com/world/middle-east/suspected-israeli-hackers-claim-destroy-data-irans-bank-sepah-2025-06-17/">There were some attacks on some banks</a></li>
  <li>One of the largest cryptocurrency exchanges in Iran was <a href="https://techcrunch.com/2025/06/18/hackers-steal-and-destroy-millions-from-irans-largest-crypto-exchange/">hacked</a> and more than 100 million dollars was stolen</li>
  <li>There were claims that Israeli drones were using Iranian SIM card internet to operate</li>
</ul>

<p>I am not going to comment on the validity of these arguments, they may be true. But remember that the internet also was shut down during the <a href="https://en.wikipedia.org/wiki/2019_Internet_blackout_in_Iran">2019</a> and <a href="https://library.fes.de/pdf-files/international/21296.pdf">2022</a> protests and there were no cyberattacks then.</p>

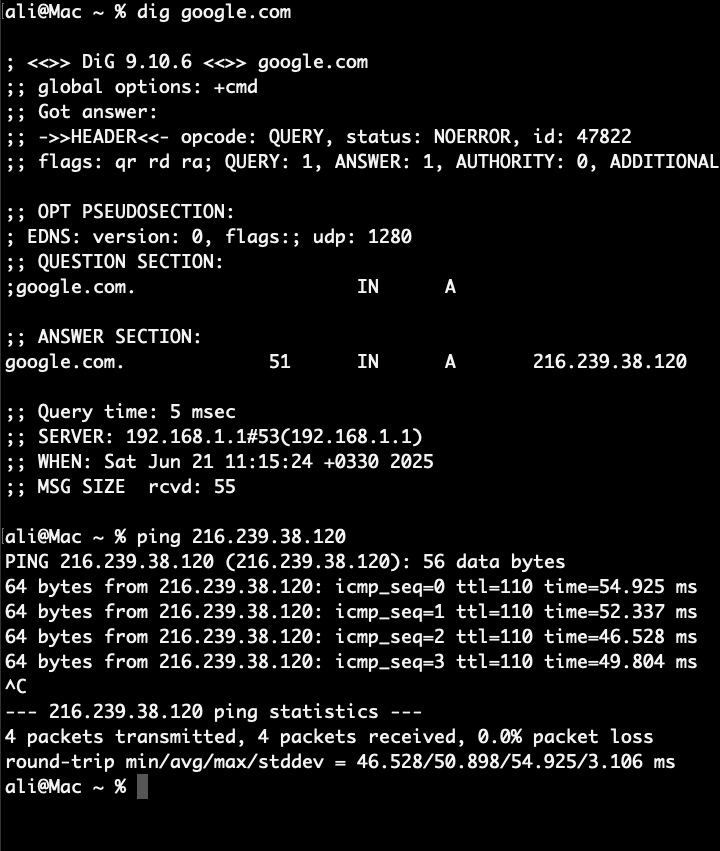
<p>There is one external website that for some reason is not blocked though: google. It seems like the ip address <code class="language-plaintext highlighter-rouge">216.239.38.120</code> which belongs to google is specifically whitelisted.</p>

<hr />

<p align="center">
  <img src="/images/2025-06-20-iran-internet/ping.png" width="50%" />
</p>
<hr />

<p></p>

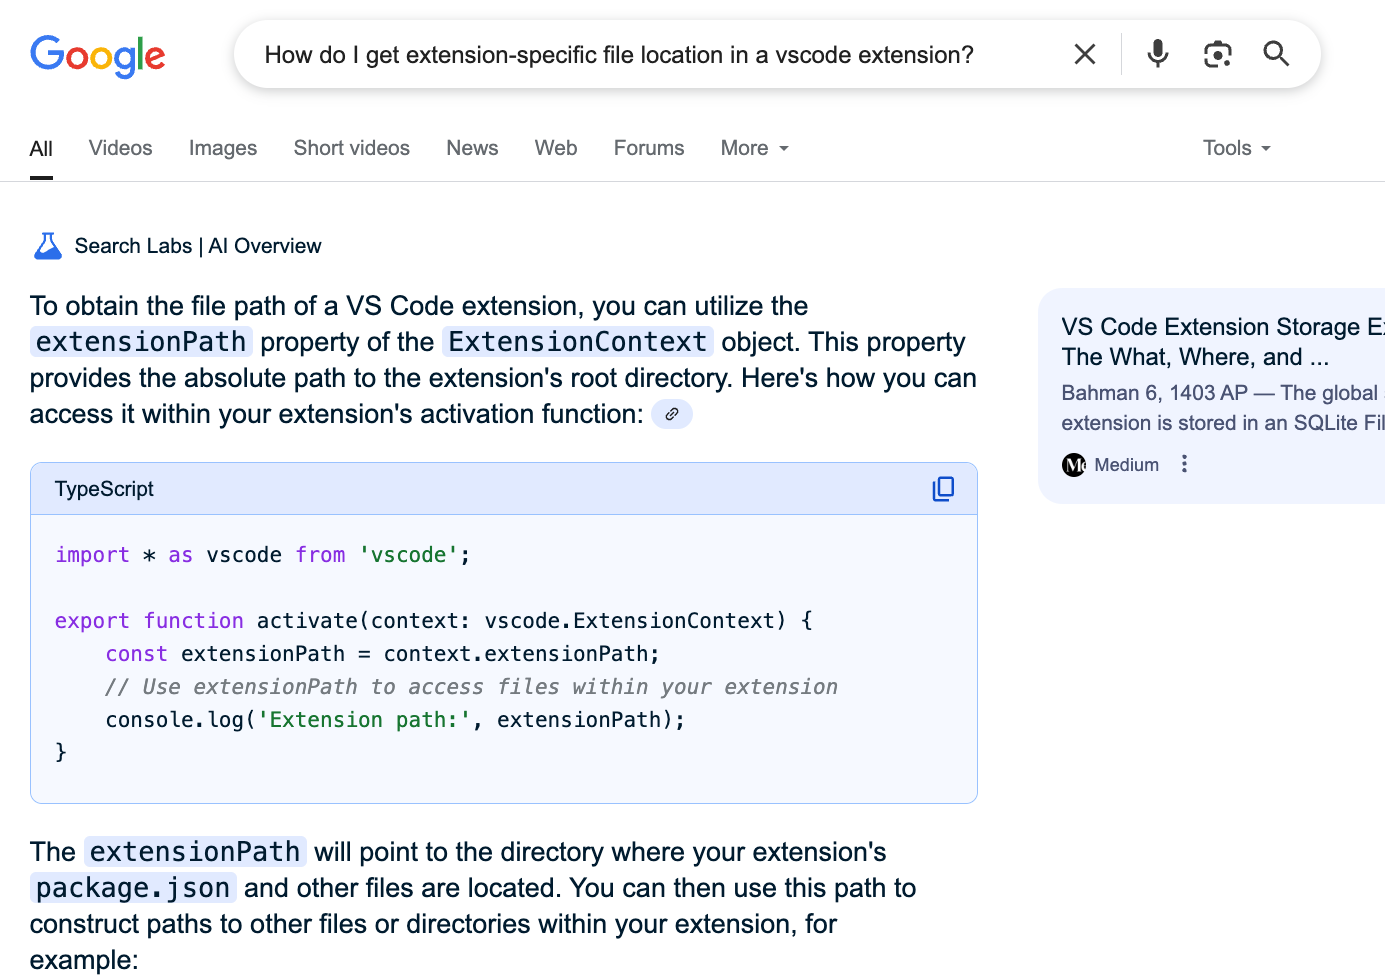
<p>So I can for example search for recent news about iran, but I can only view the title and the short content preview in the google search results, I can not open the articles.</p>

<p>Since I can’t get any real work done (even internal ssh connections are blocked now!) I decided to do some work on <a href="https://github.com/ahrm/voil">voil</a> (my vscode extension which is similar to <a href="https://github.com/stevearc/oil.nvim">oil.nvim</a>) which I have been putting off for a while, it is a fun way to distract myself and stop stressing about the news. The problem is, I am not really experienced when it comes to vscode extensions, which means a lot of documentation lookups is necessary. And you might guess what the problem is: while I can search for the documentation, I have no way of actually reading the contents … or do I? This is where the AI preview feature comes in, while this feature has been hated on a lot since its introduction, I can’t deny that it did really help keep my sanity during this time.</p>

<hr />

<p align="center">
  <img src="/images/2025-06-20-iran-internet/preview.png" width="75%" />
</p>
<hr />

<p></p>

<p>Unfortunately there is no way to force an AI preview answer (and it is not even deterministic, for the same query sometimes there is an ai answer and sometimes there isn’t). But forming the query as a question significantly increases the probability of an answer though of course it is not 100%. Unfortunately I found it to be less useful for reading news, but it was very effective for reading the documentation.</p>

<p>Anyway, while it is fashionable these days to hate on everything AI-related, I thought it was salient to mention this small way that AI managed to help me. Of course google used to have a cache feature where you could view the cached version of websites. It was a highly useful feature, which, of course, means it was removed a while back. If that feature was still available, all these shenanigans would have been unnecessary, though I suspect if that was the case then the google IP would not have been whitelisted in the first place. Also it would have been very useful to have a way to force/control the AI preview.</p>]]></content><author><name></name></author><category term="jekyll" /><category term="update" /><summary type="html"><![CDATA[]]></summary></entry><entry><title type="html">Three-eyed forehead in Stable Diffusion</title><link href="/jekyll/update/2023/01/02/three-eyed-forehead.html" rel="alternate" type="text/html" title="Three-eyed forehead in Stable Diffusion" /><published>2023-01-02T11:15:21+00:00</published><updated>2023-01-02T11:15:21+00:00</updated><id>/jekyll/update/2023/01/02/three-eyed-forehead</id><content type="html" xml:base="/jekyll/update/2023/01/02/three-eyed-forehead.html"><![CDATA[<script type="text/javascript">

function onClickGenerator(elemId, path){
    let elem = document.getElementById(elemId);
    elem.src = path;
}

</script>

<p>Today I saw an <a href="https://jalammar.github.io/ai-image-generation-tools/">interesting post</a> on hackernews where the author tried to remake an old game by recreating the pixelated art using some AI image generation models for example:</p>

<hr />

<p align="center">
  <img src="/images/2023-01-02-three-eyes/comparison.png" />
</p>
<hr />

<p></p>

<p>It worked reasonably well for most of the images, but there is one image which could not be easily created using the models, not even with stable diffusion inpainting:</p>
<hr />

<p align="center">
  <img width="400px" src="/images/2023-01-02-three-eyes/nemesis.png" />
</p>
<hr />

<p></p>

<p>Apparently it was impossible to recreate the three eyes on the forehead. I have a few theories why this is the case:</p>

<ul>
  <li>Probably there are a lot of “normal” looking humanoid portraits in the dataset, so the model is probably heavily biased towards producing “normal” humanoids.</li>
  <li>These models usually have trouble with numbers, so even when there are eyes in the forehead, it is rarely exactly three eyes</li>
</ul>

<p>I was wondering if using the advanced inpainting of my <a href="https://github.com/ahrm/UnstableFusion#how-to-use-advanced-inpainting">Stable Diffusion desktop frontend</a> frontend, we could achieve the illusive three-eyed forehead.</p>

<p>Before we begin, let me give you a quick overview of how stable diffusion inpainting (and my advanced inpainting implementation) work. I assume you are already familiar with the basics of how diffusion models work, if you are not, there are <a href="https://stable-diffusion-art.com/how-stable-diffusion-work/">excellent resources</a> on the web.</p>

<p>In order to inpaint, first the masked portion of the image is filled in using a “dumb” inpainting algorithm (for example color each pixel with the closest non-masked pixel’s color). Then we use the encoder to encode this image to the latent representation of the diffusion model. Then we add some noise to the masked part of the image and run the normal diffusion process.</p>

<p>Using advanced inpainting, we modify the first part of this process, so instead of using an algorithm to inpaint the missing parts, we could manually specify an initial image in the masked area. This heavily guides the diffusion process to generate something resembling the initial image. Here is a demo of this method:</p>

<hr />

<video muted="" controls="" width="100%">
    <source src="/images/2023-01-02-three-eyes/inpainting.mp4" type="video/mp4" />
</video>
<hr />

<p></p>

<p>Here is how I approached this problem:
First I downloaded a random eye image from the web and used advanced inpainting to create a version with just one eye:</p>

<hr />

<p align="center">
  <img src="/images/2023-01-02-three-eyes/one-eye.png" />
</p>
<div><small><i>Prompt: Demonic red eye on the forehead</i></small></div>
<div><small><i>Negative Prompt: Eyelashes</i></small></div>
<div><small><i>Generated using advanced inpainting by pasting an eye image from the web on the forehead</i></small></div>
<hr />

<p></p>

<p>I didn’t bother making this look good, because we will have to inpaint over it anyway to generate the three eyes. I just needed something reasonable. Now we paste this eye on the forehead to create an initial image for the advanced inpainting:</p>

<hr />

<p align="center">
  <img src="/images/2023-01-02-three-eyes/initial.png" />
</p>
<hr />

<p></p>

<p>Now we mask the three eyes, but use the original image as the initial image. This will guide the diffusion process to put three eyes in the masked location. We can even repeatedly apply this process, using the same mask each time but using the newer images (undoing changes if the new images were not as good), we can gradually guide it to generate something that we want (we can even change the prompt and parameters each time). Here is a sequence of generated images:</p>

<hr />

<p align="center">
  <button onclick="onClickGenerator('seq', '/images/2023-01-02-three-eyes/initial.png')">0</button>
  <button onclick="onClickGenerator('seq', '/images/2023-01-02-three-eyes/1.png')">1</button>
  <button onclick="onClickGenerator('seq', '/images/2023-01-02-three-eyes/2.png')">2</button>
  <button onclick="onClickGenerator('seq', '/images/2023-01-02-three-eyes/3.png')">3</button>
  <button onclick="onClickGenerator('seq', '/images/2023-01-02-three-eyes/4.png')">4</button>
  <img id="seq" src="/images/2023-01-02-three-eyes/initial.png" />
</p>
<hr />

<p></p>

<p>You may notice the border around the masked area, but we could fix that we normal inpainting:</p>

<hr />

<p align="center">
  <button onclick="onClickGenerator('mask', '/images/2023-01-02-three-eyes/masked.png')">masked</button>
  <button onclick="onClickGenerator('mask', '/images/2023-01-02-three-eyes/after.png')">after</button>
  <img id="mask" src="/images/2023-01-02-three-eyes/masked.png" />
</p>
<hr />

<p>And here is the final result:</p>
<hr />

<p align="center">
  <img id="mask" src="/images/2023-01-02-three-eyes/after.png" />
</p>
<hr />

<p>Of course it is not a masterpiece, but it was a very fun experiment. And it has the potential to be way more fun, because I was running it on an old 1070, each inpainting took about 20 seconds which was quite annoying. But I could envision a future where generation is basically real-time, imagine navigating through possible generations using mouse wheel and tweaking the parameters and seeing the effects in real-time. With the <a href="https://twitter.com/emostaque/status/1598131202044866560">supposed improvements</a> in stable diffusion, this future might not be far away.</p>

<p></p>]]></content><author><name></name></author><category term="jekyll" /><category term="update" /><summary type="html"><![CDATA[]]></summary></entry><entry><title type="html">Sioyek 2.0 Release Notes</title><link href="/jekyll/update/2022/12/12/sioyek-2.html" rel="alternate" type="text/html" title="Sioyek 2.0 Release Notes" /><published>2022-12-12T11:15:21+00:00</published><updated>2022-12-12T11:15:21+00:00</updated><id>/jekyll/update/2022/12/12/sioyek-2</id><content type="html" xml:base="/jekyll/update/2022/12/12/sioyek-2.html"><![CDATA[<p><a href="https://sioyek.info/">Sioyek</a> is an open-source, cross-platform PDF viewer, optimized for research papers and textbooks. These are the release notes for the recently released <a href="https://github.com/ahrm/sioyek/releases/latest">sioyek 2.0</a>. If you are not familiar with sioyek, <a href="https://www.youtube.com/watch?v=RaHRvnb0dY8">here</a> is a video tutorial.</p>

<h1 id="super_fast_search">super_fast_search</h1>

<p>We now have a <code class="language-plaintext highlighter-rouge">super_fast_search</code> option which can be enabled in <code class="language-plaintext highlighter-rouge">prefs_user.config</code> like so:</p>
<div class="language-plaintext highlighter-rouge"><div class="highlight"><pre class="highlight"><code>super_fast_search 1
</code></pre></div></div>
<p>When enabled, sioyek indexes document texts for <em>extremely</em> fast search:</p>

<hr />

<video muted="" controls="" width="100%">
    <source src="/images/2022-09-1-pdf-viewer-text-search-benchmark/video.mp4" type="video/mp4" />
</video>
<hr />

<p></p>

<p>For a more thorough benchmark and comparison with other viewers see <a href="https://ahrm.github.io/jekyll/update/2022/09/11/pdf-viewer-text-search-benchmark.html">this blog post</a>.</p>

<p>The reasons that it is not enabled by default is that the index slightly increases memory usage (about 50MB for every 1000 pages). It should not be a big deal for most users though, so I recommend enabling it unless you have &lt;2GB RAM.</p>

<p>When <code class="language-plaintext highlighter-rouge">super_fast_search</code> is enabled, we have a <code class="language-plaintext highlighter-rouge">regex_search</code> command which uses regular expressions to search the document. For example searching for <code class="language-plaintext highlighter-rouge">[0-9]</code> finds all the digits in the document.</p>

<h1 id="scrolling-between-pages-in-overview-window">Scrolling between pages in overview window</h1>

<p>Sioyek allows you to open a quick overview of references (even when they are not linked in the PDF file). Previously you could scroll in this window but only in the original page. Now, we allow you to scroll to other pages in the overview window:</p>

<hr />

<video muted="" controls="" width="100%">
    <source src="/images/2022-12-12-sioyek-2/overview.mp4" type="video/mp4" />
</video>
<hr />

<p></p>

<h1 id="search-results-in-an-overview">Search results in an overview</h1>
<p>Using <code class="language-plaintext highlighter-rouge">overview_next_item</code> and <code class="language-plaintext highlighter-rouge">overview_prev_item</code> commands, you can now open an overview to search results instead of jumping to them:</p>

<hr />

<video muted="" controls="" width="100%">
    <source src="/images/2022-12-12-sioyek-2/search.mp4" type="video/mp4" />
</video>
<hr />

<p></p>

<h1 id="overview_to_portal">overview_to_portal</h1>

<p>Added a new <code class="language-plaintext highlighter-rouge">overview_to_portal</code> command which opens a quick overview to the closest portal. Previously portals were mostly useful for users with multiple monitors, but now they should be beneficial for all users. See the portal section of tutorial video for a brief introduction to what portals are, as well as a demo of this feature.</p>

<h1 id="macros">Macros</h1>

<p>You can now define macros in your <code class="language-plaintext highlighter-rouge">prefs_user.config</code> file, which can be used to execute multiple commands. For example:</p>

<div class="language-plaintext highlighter-rouge"><div class="highlight"><pre class="highlight"><code>new_macro _goto_top_right goto_top_of_page;goto_right
</code></pre></div></div>

<p>Note that macro names must start with an underscore so as not to be confused with built-in sioyek commands. The commands in the list are separated using a semicolon.</p>

<h1 id="source-other-config-files">Source other config files</h1>
<p>Added a source command which allows you to include another config file in your <code class="language-plaintext highlighter-rouge">prefs_user.config</code>. Can be used like this:</p>
<div class="language-plaintext highlighter-rouge"><div class="highlight"><pre class="highlight"><code>source /path/to/other/file.config
</code></pre></div></div>

<p>Which is quite useful for easier installation of extensions and themes. For example see the dracula theme here: https://draculatheme.com/sioyek.</p>

<h1 id="improved-extensions">Improved extensions</h1>

<p>The <a href="https://pypi.org/project/sioyek/">official python module</a> now uses a much faster communication method with the running sioyek process. Moreover, we have added some new variables which can be used in extensions, for example <code class="language-plaintext highlighter-rouge">%{selection_begin_document}</code> and <code class="language-plaintext highlighter-rouge">%{selection_end_document}</code> which expand to the current selection locations, and <code class="language-plaintext highlighter-rouge">%{selected_rect}</code> which expands to the current selected rectanle using the new <code class="language-plaintext highlighter-rouge">select_rect</code> command.</p>

<p>For example <a href="https://github.com/ahrm/sioyek-python-extensions#-add_text">here</a> is an extension that uses these new options to add text annotations to sioyek:</p>

<hr />

<video muted="" controls="" width="100%">
    <source src="/images/2022-12-12-sioyek-2/text.mp4" type="video/mp4" />
</video>
<hr />

<p></p>

<h1 id="other-changes">Other changes</h1>

<ul>
  <li>Upgrade to MuPDF 1.20 .</li>
  <li>New keybind parsing method with support for non-standard layouts and unicode characters</li>
  <li>Add a smooth scroll mode.</li>
  <li>Add ability to select single words using <code class="language-plaintext highlighter-rouge">keyboard_select</code> command</li>
  <li>Add a scrollbar which can be enabled using <code class="language-plaintext highlighter-rouge">toggle_scrollbar</code> command</li>
  <li>Add commands to set configuration options at runtime.</li>
  <li>Add <code class="language-plaintext highlighter-rouge">prerendered_page_count</code> option which allows to configure how many pages does sioyek prerender</li>
  <li>Add an option to show the closest bookmark in the statusbar</li>
  <li>Add an option to indicate whether we are close to a portal in the statusbar</li>
  <li>Add an option to highlight using middle click instead of pressing a button. See https://github.com/ahrm/sioyek/commit/7390a40dec98b829c8beacd5d3997b00d2072ec7.</li>
  <li>Add ability to specify colors in config files using hexadecimal strings. For example instead of <code class="language-plaintext highlighter-rouge">1 1 0</code> you can now use <code class="language-plaintext highlighter-rouge">#ffff00</code>.</li>
  <li>Many bug-fixes and quality of life improvements</li>
</ul>]]></content><author><name></name></author><category term="jekyll" /><category term="update" /><summary type="html"><![CDATA[Sioyek is an open-source, cross-platform PDF viewer, optimized for research papers and textbooks. These are the release notes for the recently released sioyek 2.0. If you are not familiar with sioyek, here is a video tutorial.]]></summary></entry><entry><title type="html">PDF viewer text search speed comparison</title><link href="/jekyll/update/2022/09/11/pdf-viewer-text-search-benchmark.html" rel="alternate" type="text/html" title="PDF viewer text search speed comparison" /><published>2022-09-11T11:15:21+00:00</published><updated>2022-09-11T11:15:21+00:00</updated><id>/jekyll/update/2022/09/11/pdf-viewer-text-search-benchmark</id><content type="html" xml:base="/jekyll/update/2022/09/11/pdf-viewer-text-search-benchmark.html"><![CDATA[<p>Recently, I implemented a super fast search index into sioyek which accelerates normal search and also enabled regular expression search.
It is not yet released in a stable sioyek build, but if you want to try it out, there are experimental builds <a href="https://github.com/hexomancer/sioyek/releases/tag/v0.31.391">here</a>.
It is not enabled by default (it slightly increases memory consumption, so I disabled it by default) but can be enabled by adding this to <code class="language-plaintext highlighter-rouge">prefs_user.config</code> file:</p>

<div class="language-plaintext highlighter-rouge"><div class="highlight"><pre class="highlight"><code>super_fast_search 1
</code></pre></div></div>

<p>In order to test it, I decided to find all instances of letter ‘a’ in a 730-page document. See the result in this video:</p>

<hr />

<video muted="" controls="" width="100%">
    <source src="/images/2022-09-1-pdf-viewer-text-search-benchmark/video.mp4" type="video/mp4" />
</video>
<hr />

<p></p>

<p>However, I didn’t think this benchmark was good enough for multiple reasons:</p>

<ul>
  <li>Some very popular PDF viewers are missing. The reason is that many of them don’t report the number of matches (for example sumatra just jumps to the next match and firefox just finds the first 1000 matches). Therefore we could not compare those readers.</li>
  <li>Finding all instances of ‘a’ might not be a very useful search in practice</li>
  <li>Sioyek finds the results so fast that we can not get an accurate measure of its time</li>
</ul>

<p>So I decided to find a harder PDF file and do another benchmark on that. Now the previous file already wasn’t that small (it was 730 pages), but I needed a significantly larger file, and I didn’t want to create a file myself because I wanted the result to be as authentic as possible. In my search of a big-ass book I came across this behemoth:</p>

<hr />

<p align="center">
  <img width="200px" src="/images/2022-09-1-pdf-viewer-text-search-benchmark/behemoth.jpeg" />
</p>
<hr />

<p></p>

<p>It’s 4100 pages of tightly packed, two-column, small-font text. And it is the perfect test subject for us.</p>

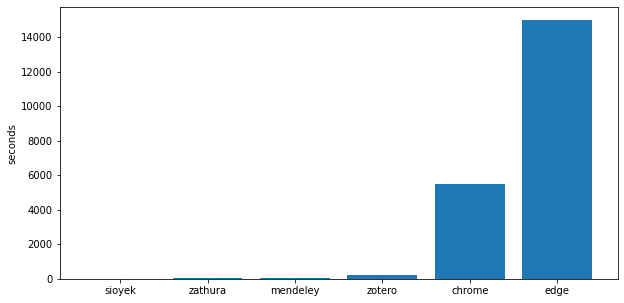
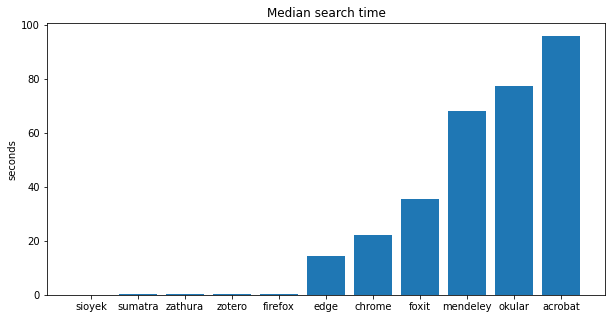
<p>But before doing the new tests, let’s repeat our old test (finding all instances of ‘a’) in this book, just to get a sense of how large it is. I tested it only with the viewers that found all the results (sioyek, zathura, mendeley, zoreto, chrome, and edge). Here are the results:</p>

<hr />

<p align="center">
  <img width="50%" src="/images/2022-09-1-pdf-viewer-text-search-benchmark/old_1.png" />
</p>
<hr />

<p></p>

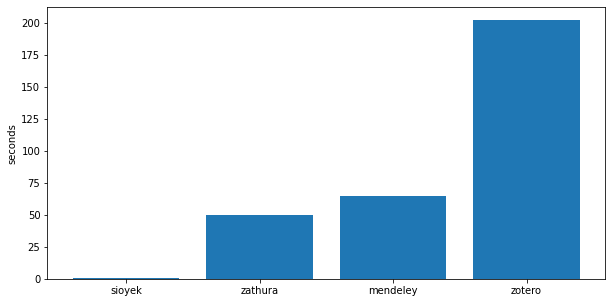
<p>Well, that’s not really useful. Let’s remove chrome and edge which seem to be outliers, hopefully now it will be more informative:</p>

<hr />

<p align="center">
  <img width="50%" src="/images/2022-09-1-pdf-viewer-text-search-benchmark/old_2.png" />
</p>
<hr />

<p></p>

<p>Fuck it. Here is the raw data:</p>

<table>
  <thead>
    <tr>
      <th>program</th>
      <th>time (s)</th>
    </tr>
  </thead>
  <tbody>
    <tr>
      <td>sioyek</td>
      <td>0.9</td>
    </tr>
    <tr>
      <td>zathura</td>
      <td>50</td>
    </tr>
    <tr>
      <td>mendeley</td>
      <td>65</td>
    </tr>
    <tr>
      <td>zotero</td>
      <td>202</td>
    </tr>
    <tr>
      <td>chrome</td>
      <td>5500</td>
    </tr>
    <tr>
      <td>edge</td>
      <td>15000</td>
    </tr>
  </tbody>
</table>

<p>Note that chrome and edge took so long that I terminated them after 10 minutes and extrapolated the final time based on the results found in ten minutes. Which is very generous because chrome was showing clear signs of non-linear behavior which means that the true time might be even larger than this.</p>

<h1 id="main-benchmark">Main benchmark</h1>

<p>Okay now we get to the main benchmark. In order to reduce the variance and also
effects of particular algorithms (for example some viewers search from the beginning, and so they perform better
if the query is in the first pages, some other viewers start from current page, etc.) we used the following process:</p>

<ul>
  <li>10 pages in the document were chosen completely randomly</li>
  <li>A string was chosen from each page, such that this string does not appear on any other page of the document</li>
  <li>In order to test a viewer, we open the viewer on the first page of the document and search for the chosen strings, one by one, and we don’t change the pages (so we are on the page of ith result when starting the search for (i+1)th result)</li>
  <li>We report the average and the median of search times</li>
</ul>

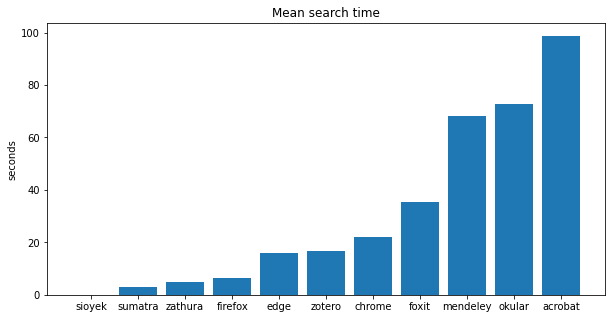
<p>Here are the results:</p>

<hr />

<p align="center">
  <img width="50%" src="/images/2022-09-1-pdf-viewer-text-search-benchmark/new_1.png" />
</p>
<hr />

<p></p>

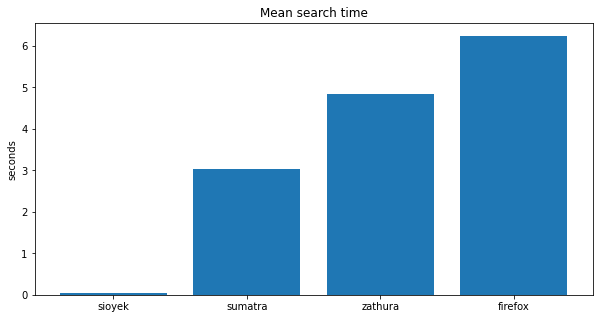
<p>Again, let’s remove the large values:</p>
<hr />

<p align="center">
  <img width="50%" src="/images/2022-09-1-pdf-viewer-text-search-benchmark/new_2.png" />
</p>
<hr />

<p></p>

<p>Sigh, here are the raw numbers:</p>

<table>
  <thead>
    <tr>
      <th>program</th>
      <th>average time (s)</th>
    </tr>
  </thead>
  <tbody>
    <tr>
      <td>sioyek</td>
      <td>0.03</td>
    </tr>
    <tr>
      <td>sumatra</td>
      <td>3.0</td>
    </tr>
    <tr>
      <td>zathura</td>
      <td>4.8</td>
    </tr>
    <tr>
      <td>firefox</td>
      <td>6.2</td>
    </tr>
    <tr>
      <td>edge</td>
      <td>15.7</td>
    </tr>
    <tr>
      <td>zotero</td>
      <td>16.5</td>
    </tr>
    <tr>
      <td>chrome</td>
      <td>22.2</td>
    </tr>
    <tr>
      <td>foxit</td>
      <td>35.4</td>
    </tr>
    <tr>
      <td>mendeley</td>
      <td>68.1</td>
    </tr>
    <tr>
      <td>okular</td>
      <td>72.8</td>
    </tr>
    <tr>
      <td>acrobat</td>
      <td>98.7</td>
    </tr>
  </tbody>
</table>

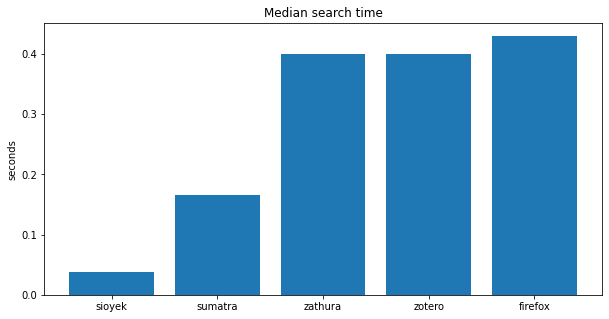
<p>Now I must admit, the reason sioyek is so fast is because it creates a search index when you open the document. In these tests I have waited until this search index is built (with the justification that the index-building is fast enough that by the time the user wants to do a search in the document it is done). Some other PDF viewers (namely, zathura, firefox and sumatra) seem to create indices to speed up searches too, however, instead of creating it when the document is opened, they create it the first time you perform a search, which causes the first search to take unusually long time but the subsequent searches are much faster. I don’t think this comparison is unfair, because it accurately reflects the time that the users have to wait for their search results (in fact, I think it is a little generous because 10 searches is probably above-average number of searches, and the fewer searches we have, the more pronounced the effect of first search indexing becomes). But to be completely fair, I also computed the median search time which is not affected by the indexing in the first search. Here are the results:</p>

<hr />

<p align="center">
  <img width="50%" src="/images/2022-09-1-pdf-viewer-text-search-benchmark/index_1.png" />
</p>
<hr />

<p></p>

<p>You can see there is a visible gap between the programs that do the indexing and those that don’t. Here is a comparison the programs that do the indexing:</p>

<hr />

<p align="center">
  <img width="50%" src="/images/2022-09-1-pdf-viewer-text-search-benchmark/index_2.png" />
</p>
<hr />

<p></p>

<h1 id="indexing-time">Indexing Time</h1>

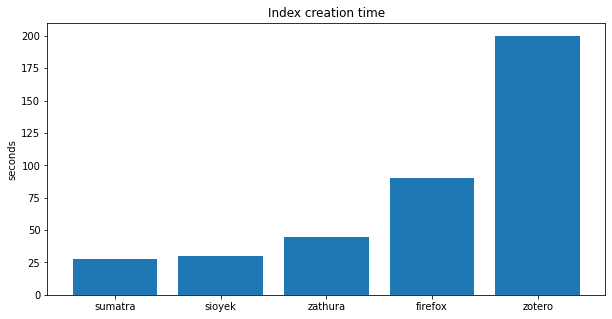
<p>One more important factor for the programs that do the indexing is the time it takes to create the index. Here are the results:</p>

<hr />

<p align="center">
  <img width="50%" src="/images/2022-09-1-pdf-viewer-text-search-benchmark/index_time.png" />
</p>
<hr />

<p></p>

<p>Finally sioyek has been dethroned, although it is very close (30 seconds vs 28 seconds). I think the reason is that
we don’t just index the text of the document during the index procedure. We also try to find all the figures, references, equations, etc. which enables the <a href="https://sioyek.info/#smartjump">smart jump</a> feature.</p>

<h1 id="how-does-the-indexing-work">How does the indexing work?</h1>

<p>I wish I could tell you that I made some genius optimizations to make the search fast, however, the truth is that the index is extremely trivial: we just concatenate the text of all the pages, and also create some backward indices so that we can find the page and location of a match in the document given its location in the concatenated string. That’s it. In fact almost all the credits goes to the writers of c++’s standard library functions <code class="language-plaintext highlighter-rouge">std::find</code> and <code class="language-plaintext highlighter-rouge">std::regex_search</code>.</p>

<p>So after all, sioyek’s speed is not that impressive. What I would say <strong>is</strong> impressive though is how slow some programs manage to be. For example the average search time in acrobat, the program create by adobe, the multi-billion dollar company that <em>created the PDF format</em> and employs more than 25000 people is more than 3000 times slower than the average search time in sioyek. It is even more than 3 times slower than the time it takes sioyek to <em>build the entire search index</em>! Now that’s impressive.</p>]]></content><author><name></name></author><category term="jekyll" /><category term="update" /><summary type="html"><![CDATA[Recently, I implemented a super fast search index into sioyek which accelerates normal search and also enabled regular expression search. It is not yet released in a stable sioyek build, but if you want to try it out, there are experimental builds here. It is not enabled by default (it slightly increases memory consumption, so I disabled it by default) but can be enabled by adding this to prefs_user.config file:]]></summary></entry><entry><title type="html">Reading textbooks with lots of references using sioyek</title><link href="/jekyll/update/2022/08/30/sioyek-feature-overview.html" rel="alternate" type="text/html" title="Reading textbooks with lots of references using sioyek" /><published>2022-08-30T11:15:21+00:00</published><updated>2022-08-30T11:15:21+00:00</updated><id>/jekyll/update/2022/08/30/sioyek-feature-overview</id><content type="html" xml:base="/jekyll/update/2022/08/30/sioyek-feature-overview.html"><![CDATA[<p>This post is an overview of main features of <a href="https://sioyek.info/">sioyek</a>, a PDF viewer optimized for reading research papers and textbooks.</p>

<p>Suppose you are reading a textbook with a lot of references. Something like this:</p>
<hr />

<p align="center">
  <img src="/images/2022-08-30-sioyek-feature-overview/lots_of_references.png" />
</p>
<hr />

<p></p>
<p>Imagine how much time and context you lose by scrolling back and forth every time we see a reference. Sioyek automatically detects the reference
targets (even if the document doesn’t have links, which is the case for the document in this example) and jumps to references. You can also mark your location before the jump so that you don’t lose your context when you come back:</p>

<hr />

<video muted="" controls="" width="100%">
    <source src="/images/2022-08-30-sioyek-feature-overview/underline.mp4" type="video/mp4" />
</video>
<hr />

<p></p>

<p>But wait, there is more! You don’t even have to jump to the references because sioyek can show a preview of the referenced location:</p>

<hr />

<video muted="" controls="" width="100%">
    <source src="/images/2022-08-30-sioyek-feature-overview/preview.mp4" type="video/mp4" />
</video>
<hr />

<p></p>

<p>But wait, there is more! The marker used in the first video to mark the line can also be moved to highlight the current line being read. This has many advantages:</p>
<ul>
  <li>Makes the current line stand out, which makes it more readable, especially for people with dyslexia</li>
  <li>You never lose the context of which line you were reading (e.g. when someone calls you)</li>
  <li>Automatically handles multicolumn documents</li>
  <li>Since there is usually only one reference on the current line, we can automatically detect it and show the destination just by pressing a button, without even needing to click on the reference.</li>
</ul>

<hr />

<video muted="" controls="" width="100%">
    <source src="/images/2022-08-30-sioyek-feature-overview/ruler.mp4" type="video/mp4" />
</video>
<hr />

<p></p>

<p>But wait, there is more! You can search the papers in google scholar just by middle-clicking on their name. Or you can download them directly from google scholar and scihub by control+clicking on their name. And the beautiful thing is that last feature (downloading papers from google scholar and scihub) is not a built-in feature but it is implemented using an extension, and you can create similar extensions of your own!
<a href="https://sioyek-documentation.readthedocs.io/en/latest/scripting.html">This</a> is the documentation on how to build your own extensions, and <a href="https://github.com/ahrm/sioyek-python-extensions">these are</a> some of the extensions that I have built (including the one that downloads from google scholar and scihub).</p>

<hr />

<video muted="" controls="" width="100%">
    <source src="/images/2022-08-30-sioyek-feature-overview/paper_downloader.mp4" type="video/mp4" />
</video>
<hr />

<p></p>]]></content><author><name></name></author><category term="jekyll" /><category term="update" /><summary type="html"><![CDATA[This post is an overview of main features of sioyek, a PDF viewer optimized for reading research papers and textbooks.]]></summary></entry><entry><title type="html">Implementing text to speech for sioyek PDF viewer</title><link href="/jekyll/update/2022/07/05/implementing-a-screen-reader-for-sioyek.html" rel="alternate" type="text/html" title="Implementing text to speech for sioyek PDF viewer" /><published>2022-07-05T11:15:21+00:00</published><updated>2022-07-05T11:15:21+00:00</updated><id>/jekyll/update/2022/07/05/implementing-a-screen-reader-for-sioyek</id><content type="html" xml:base="/jekyll/update/2022/07/05/implementing-a-screen-reader-for-sioyek.html"><![CDATA[<p>Note: the scripts in this post were tested on windows and do have some windows-specific code, but they can easily be ported to other operating systems.</p>

<p>Here is the final result (enable audio):</p>

<video muted="" autoplay="" controls="" width="100%">
    <source src="/images/2022-07-05-implementing-a-screen-reader-for-sioyek/tts.mp4" type="video/mp4" />
</video>
<h1 id="introduction">Introduction</h1>

<p>One of the main new features in <a href="https://github.com/ahrm/sioyek">sioyek 1.4</a> is the ability to execute external scripts and the ability to control <code class="language-plaintext highlighter-rouge">sioyek</code> from command line. In this post, we show how to combine this features to implement a simple (yet completely functional) screen reader for <code class="language-plaintext highlighter-rouge">sioyek</code>.</p>

<p>Sioyek has the ability to execute scripts, for example consider the following script which creates an OCRed version of a PDF file using <a href="https://ocrmypdf.readthedocs.io/en/latest/">ocrmypdf</a> and then opens the result:</p>

<div class="language-python highlighter-rouge"><div class="highlight"><pre class="highlight"><code><span class="kn">import</span> <span class="nn">sys</span>
<span class="kn">import</span> <span class="nn">os</span>

<span class="k">if</span> <span class="n">__name__</span> <span class="o">==</span> <span class="s">'__main__'</span><span class="p">:</span>
    <span class="n">file_path</span> <span class="o">=</span> <span class="n">sys</span><span class="p">.</span><span class="n">argv</span><span class="p">[</span><span class="mi">1</span><span class="p">]</span>
    <span class="n">new_path</span> <span class="o">=</span> <span class="n">file_path</span><span class="p">.</span><span class="n">split</span><span class="p">(</span><span class="s">'.'</span><span class="p">)[</span><span class="mi">0</span><span class="p">]</span> <span class="o">+</span> <span class="s">'_new.pdf'</span>
    <span class="n">os</span><span class="p">.</span><span class="n">system</span><span class="p">(</span><span class="s">'ocrmypdf "'</span> <span class="o">+</span> <span class="n">file_path</span> <span class="o">+</span> <span class="s">'" "'</span> <span class="o">+</span> <span class="n">new_path</span> <span class="o">+</span> <span class="s">'"'</span><span class="p">)</span>
    <span class="n">os</span><span class="p">.</span><span class="n">system</span><span class="p">(</span><span class="s">'sioyek "'</span> <span class="o">+</span> <span class="n">new_path</span> <span class="o">+</span> <span class="s">'"'</span><span class="p">)</span>
</code></pre></div></div>

<p>you can run it from <code class="language-plaintext highlighter-rouge">sioyek</code> by running the execute command and entering the following:</p>
<div class="language-plaintext highlighter-rouge"><div class="highlight"><pre class="highlight"><code>python /path/to/script.py "%1"
</code></pre></div></div>
<p>Here the <code class="language-plaintext highlighter-rouge">%1</code> expands to the path of the current file in sioyek. Note that the quotation marks are necessary if the path contains spaces. There are other expanded variables other than <code class="language-plaintext highlighter-rouge">%1</code>, here is the complete list:</p>

<ul>
  <li><code class="language-plaintext highlighter-rouge">%1</code> expands to the path of the current file</li>
  <li><code class="language-plaintext highlighter-rouge">%2</code> expands to just the file name of the current file</li>
  <li><code class="language-plaintext highlighter-rouge">%3</code> expands to the selected text</li>
  <li><code class="language-plaintext highlighter-rouge">%4</code> expands to the current page number</li>
  <li><code class="language-plaintext highlighter-rouge">%5</code> expands to an input text which is received from the user using a text prompt</li>
  <li><code class="language-plaintext highlighter-rouge">%6</code> expands to the text of the current line in <code class="language-plaintext highlighter-rouge">sioyek</code>’s <a href="https://user-images.githubusercontent.com/6392321/168427739-007be805-a457-4d1f-ba14-35c5070aae5f.mp4">visual line mode</a></li>
</ul>

<p>Here is how it looks like in action:</p>

<video muted="" autoplay="" controls="" width="100%">
    <source src="/images/2022-07-05-implementing-a-screen-reader-for-sioyek/ocr_simple.mp4" type="video/mp4" />
</video>

<p>Of course, typing this command every time is not a good solution, you can predefine commands in your <code class="language-plaintext highlighter-rouge">prefs_user.config</code> file:</p>

<div class="language-plaintext highlighter-rouge"><div class="highlight"><pre class="highlight"><code>execute_command_o python /path/to/script.py "%1"
</code></pre></div></div>
<p>Now instead of typing the command, you can run the <code class="language-plaintext highlighter-rouge">execute_predefined_command</code> command in sioyek (which itself can be bound to a key) and then press <code class="language-plaintext highlighter-rouge">o</code> (<code class="language-plaintext highlighter-rouge">o</code> is the name of the predefined command, you can have 26 predefined commands with names <code class="language-plaintext highlighter-rouge">a-z</code>). Or you could directly bind a key to execute <code class="language-plaintext highlighter-rouge">execute_command_o</code> in your <code class="language-plaintext highlighter-rouge">keys_user.config</code> file:</p>
<div class="language-plaintext highlighter-rouge"><div class="highlight"><pre class="highlight"><code>execute_command_o &lt;S-r&gt;
</code></pre></div></div>
<p>Note that the <code class="language-plaintext highlighter-rouge">o</code> is just the name of the command and doesn’t have anything to do with its keybinding, for example here we have bound it to shift+r.</p>

<p>Here is another sample script which translates the highlighted text into french:</p>

<div class="language-python highlighter-rouge"><div class="highlight"><pre class="highlight"><code><span class="kn">import</span> <span class="nn">sys</span>
<span class="kn">from</span> <span class="nn">googletrans</span> <span class="kn">import</span> <span class="n">Translator</span>
<span class="kn">from</span> <span class="nn">tkinter</span> <span class="kn">import</span> <span class="n">messagebox</span>
<span class="kn">import</span> <span class="nn">tkinter</span>

<span class="k">if</span> <span class="n">__name__</span> <span class="o">==</span> <span class="s">'__main__'</span><span class="p">:</span>
    <span class="n">text</span> <span class="o">=</span> <span class="n">sys</span><span class="p">.</span><span class="n">argv</span><span class="p">[</span><span class="mi">1</span><span class="p">]</span>
    <span class="n">translator</span> <span class="o">=</span> <span class="n">Translator</span><span class="p">()</span>
    <span class="n">translation</span> <span class="o">=</span> <span class="n">translator</span><span class="p">.</span><span class="n">translate</span><span class="p">(</span><span class="n">text</span><span class="p">,</span> <span class="n">dest</span><span class="o">=</span><span class="s">'fr'</span><span class="p">)</span>
    <span class="n">root</span> <span class="o">=</span> <span class="n">tkinter</span><span class="p">.</span><span class="n">Tk</span><span class="p">()</span>
    <span class="n">root</span><span class="p">.</span><span class="n">withdraw</span><span class="p">()</span>
    <span class="n">messagebox</span><span class="p">.</span><span class="n">showinfo</span><span class="p">(</span><span class="s">"tanslation"</span><span class="p">,</span> <span class="n">translation</span><span class="p">.</span><span class="n">text</span><span class="p">)</span>
</code></pre></div></div>
<p><code class="language-plaintext highlighter-rouge">prefs_user.config</code>:</p>
<div class="language-plaintext highlighter-rouge"><div class="highlight"><pre class="highlight"><code>execute_command_t python D:\sioyek-scripts\translate.py "%6"
</code></pre></div></div>

<p><code class="language-plaintext highlighter-rouge">keys_user.config</code>:</p>
<div class="language-plaintext highlighter-rouge"><div class="highlight"><pre class="highlight"><code>execute_command_t &lt;S-t&gt;
</code></pre></div></div>
<p>Here is how it looks in action:</p>

<video muted="" autoplay="" controls="" width="100%">
    <source src="/images/2022-07-05-implementing-a-screen-reader-for-sioyek/translate.mp4" type="video/mp4" />
</video>

<h1 id="screen-reader">Screen Reader</h1>

<p>Here is a very simple text to speech scripts (works only on windows, can easily be ported to other operating systems by replacing windows text to speech with alternatives):</p>

<div class="language-python highlighter-rouge"><div class="highlight"><pre class="highlight"><code><span class="kn">import</span> <span class="nn">os</span>
<span class="kn">import</span> <span class="nn">sys</span>

<span class="k">def</span> <span class="nf">escape</span><span class="p">(</span><span class="n">s</span><span class="p">):</span>
    <span class="n">temp</span> <span class="o">=</span> <span class="s">""</span><span class="p">.</span><span class="n">join</span><span class="p">(</span><span class="n">c</span> <span class="k">for</span> <span class="n">c</span> <span class="ow">in</span> <span class="n">s</span> <span class="k">if</span> <span class="nb">ord</span><span class="p">(</span><span class="n">c</span><span class="p">)</span> <span class="o">&lt;</span> <span class="mi">127</span><span class="p">)</span>
    <span class="k">return</span> <span class="n">temp</span><span class="p">.</span><span class="n">replace</span><span class="p">(</span><span class="s">"'"</span><span class="p">,</span> <span class="s">"''"</span><span class="p">)</span>

<span class="k">if</span> <span class="n">__name__</span> <span class="o">==</span> <span class="s">'__main__'</span><span class="p">:</span>
    <span class="n">os</span><span class="p">.</span><span class="n">system</span><span class="p">(</span><span class="s">'''PowerShell -Command "Add-Type -AssemblyName System.Speech; (New-Object System.Speech.Synthesis.SpeechSynthesizer).Speak('{}');'''</span><span class="p">.</span><span class="nb">format</span><span class="p">(</span><span class="n">escape</span><span class="p">(</span><span class="n">sys</span><span class="p">.</span><span class="n">argv</span><span class="p">[</span><span class="mi">1</span><span class="p">])))</span>
</code></pre></div></div>
<p><code class="language-plaintext highlighter-rouge">prefs_user.config</code>:</p>
<div class="language-plaintext highlighter-rouge"><div class="highlight"><pre class="highlight"><code>execute_command_t python D:\sioyek-scripts\tts.py "%6"
</code></pre></div></div>

<p>This is of course, very basic and requires the user to manually read every line but it is a good base and can easily be extended to include more advanced features. I implemented a more sophisticated version <a href="https://github.com/ahrm/sioyek/tree/main/scripts/tts">here</a> which is too long to include in this post, but here is how it works at a high level:</p>

<ul>
  <li>Instead of generating speech line-by-line (which would not flow very well), we concatenate all the lines and create an audio file for the whole page</li>
  <li>First, we generate a low-quality but fast audio file using windows tts and while that is playing we use mozilla’s tts to generate a more high-quality sample. When the high-quality sample is ready, we swap it in.</li>
  <li>We align the audio and text using <a href="https://github.com/readbeyond/aeneas">aeneas</a>, when the user requests a read command from a specific line, we use this alignment to find the location of line within the audio file</li>
  <li>We automatically highlight the current line as it is being read</li>
</ul>

<p>here is the relevant <code class="language-plaintext highlighter-rouge">prefs_user.config</code> file:</p>
<div class="language-plaintext highlighter-rouge"><div class="highlight"><pre class="highlight"><code># start reading from highlighted line
execute_command_a python \path\to\server_read.py "%1" %4 "%6"
# stop reading
execute_command_b python \path\to\server_stop.py
# keep highlighting the current line being read
execute_command_c python \path\to\server_follow.py
# stop highlighting the current line being read
execute_command_d python \path\to\server_unfollow.py
# start the tts server (should be running before executing previous commands)
execute_command_e python \path\to\manager_server.py
</code></pre></div></div>
<p>and <code class="language-plaintext highlighter-rouge">keys_user.config</code> file:</p>
<div class="language-plaintext highlighter-rouge"><div class="highlight"><pre class="highlight"><code>execute_command_a r
execute_command_b &lt;S-r&gt;
execute_command_e &lt;C-&lt;f5&gt;&gt;
# when we manually move the line, stop following it
move_visual_mark_down;execute_command_d j
move_visual_mark_up;execute_command_d k
</code></pre></div></div>

<h1 id="notes">Notes</h1>
<p>Unfortunately mozilla tts is prone to something that I call “Spontaneous Stroke Syndrome” which is shown in the video below, I am not sure exactly what causes it, if someone has any ideas on what I may be doing wrong I would appreciate any help.</p>

<video muted="" autoplay="" controls="" width="100%">
    <source src="/images/2022-07-05-implementing-a-screen-reader-for-sioyek/stroke.mp4" type="video/mp4" />
</video>]]></content><author><name></name></author><category term="jekyll" /><category term="update" /><summary type="html"><![CDATA[Note: the scripts in this post were tested on windows and do have some windows-specific code, but they can easily be ported to other operating systems.]]></summary></entry><entry><title type="html">Using Language Models to (probably) Read Faster</title><link href="/jekyll/update/2022/04/14/using-languge-models-to-read-faster.html" rel="alternate" type="text/html" title="Using Language Models to (probably) Read Faster" /><published>2022-04-14T11:15:21+00:00</published><updated>2022-04-14T11:15:21+00:00</updated><id>/jekyll/update/2022/04/14/using-languge-models-to-read-faster</id><content type="html" xml:base="/jekyll/update/2022/04/14/using-languge-models-to-read-faster.html"><![CDATA[<style>
.button-selected{
    color: red;
}
.button-unselected{
}
img{
border: solid;
}

</style>

<script type="text/javascript">
function context_on_click(elem, num){
    let id = elem.id;
    var container = document.getElementById('context_comparison');

    var context_sizes = ['5', '10', '20', '40', '80', '160'];

    //var context_5_button = document.getElementById('context_5');
    //var context_10_button = document.getElementById('context_10');
    //var context_20_button = document.getElementById('context_20');
    //var context_40_button = document.getElementById('context_40');
    //var context_80_button = document.getElementById('context_80');
    //var context_160_button = document.getElementById('context_160');
    //var buttons = [context_5_button, context_10_button, context_20_button, context_40_button, context_80_button, context_160_button];

    var buttons = [];
    var images = []

    for (var context_size of context_sizes){
        buttons.push(document.getElementById('context_' + context_size));
    }

    for (var context_size of context_sizes){
        images.push(document.getElementById('img-context-' + context_size));
    }

    for (var button of buttons){
        if (button.id == elem.id){
            button.className = "button-selected"
        }
        else{
            button.className = "button-unselected"
        }
    }
    for (var image of images){
        if (image.id == "img-context-" + num){
            image.style = "";
        }
        else{
            image.style.display = "none";
        }
    }

    //container.innerHTML = '<img src="/images/2022-04-14-using-languge-models-to-read-faster/' + elem.id + '.png" width="100%"/>';
}

function method_on_click(elem){
    let id = elem.id;
    var container = document.getElementById('method_comparison');

    var bionic_button = document.getElementById('bionic');
    var unrefined_button = document.getElementById('unrefined');
    var refined_button = document.getElementById('refined');
    var filled_button = document.getElementById('fill');

    var bionic_image = document.getElementById('img-heuristic');
    var unrefined_image = document.getElementById('img-no-refine');
    var refined_image = document.getElementById('img-refine-no-fill');
    var filled_image = document.getElementById('img-refine-and-fill');

    var buttons = [bionic_button, unrefined_button, refined_button, filled_button];
    var images = [bionic_image, unrefined_image, refined_image, filled_image];
    for (var button of buttons){
        if (button.id == elem.id){
            button.className = "button-selected"
        }
        else{
            button.className = "button-unselected"
        }
    }
    for (var image of images){
        image.style.display = "none";
    }

    if (id == 'bionic'){
        bionic_image.style = "";
    }
    if (id == 'unrefined'){
        unrefined_image.style = "";
    }
    if (id == 'refined'){
        refined_image.style = "";
    }
    if (id == 'fill'){
        filled_image.style = "";
    }
}
</script>

<h2 id="idea">Idea</h2>
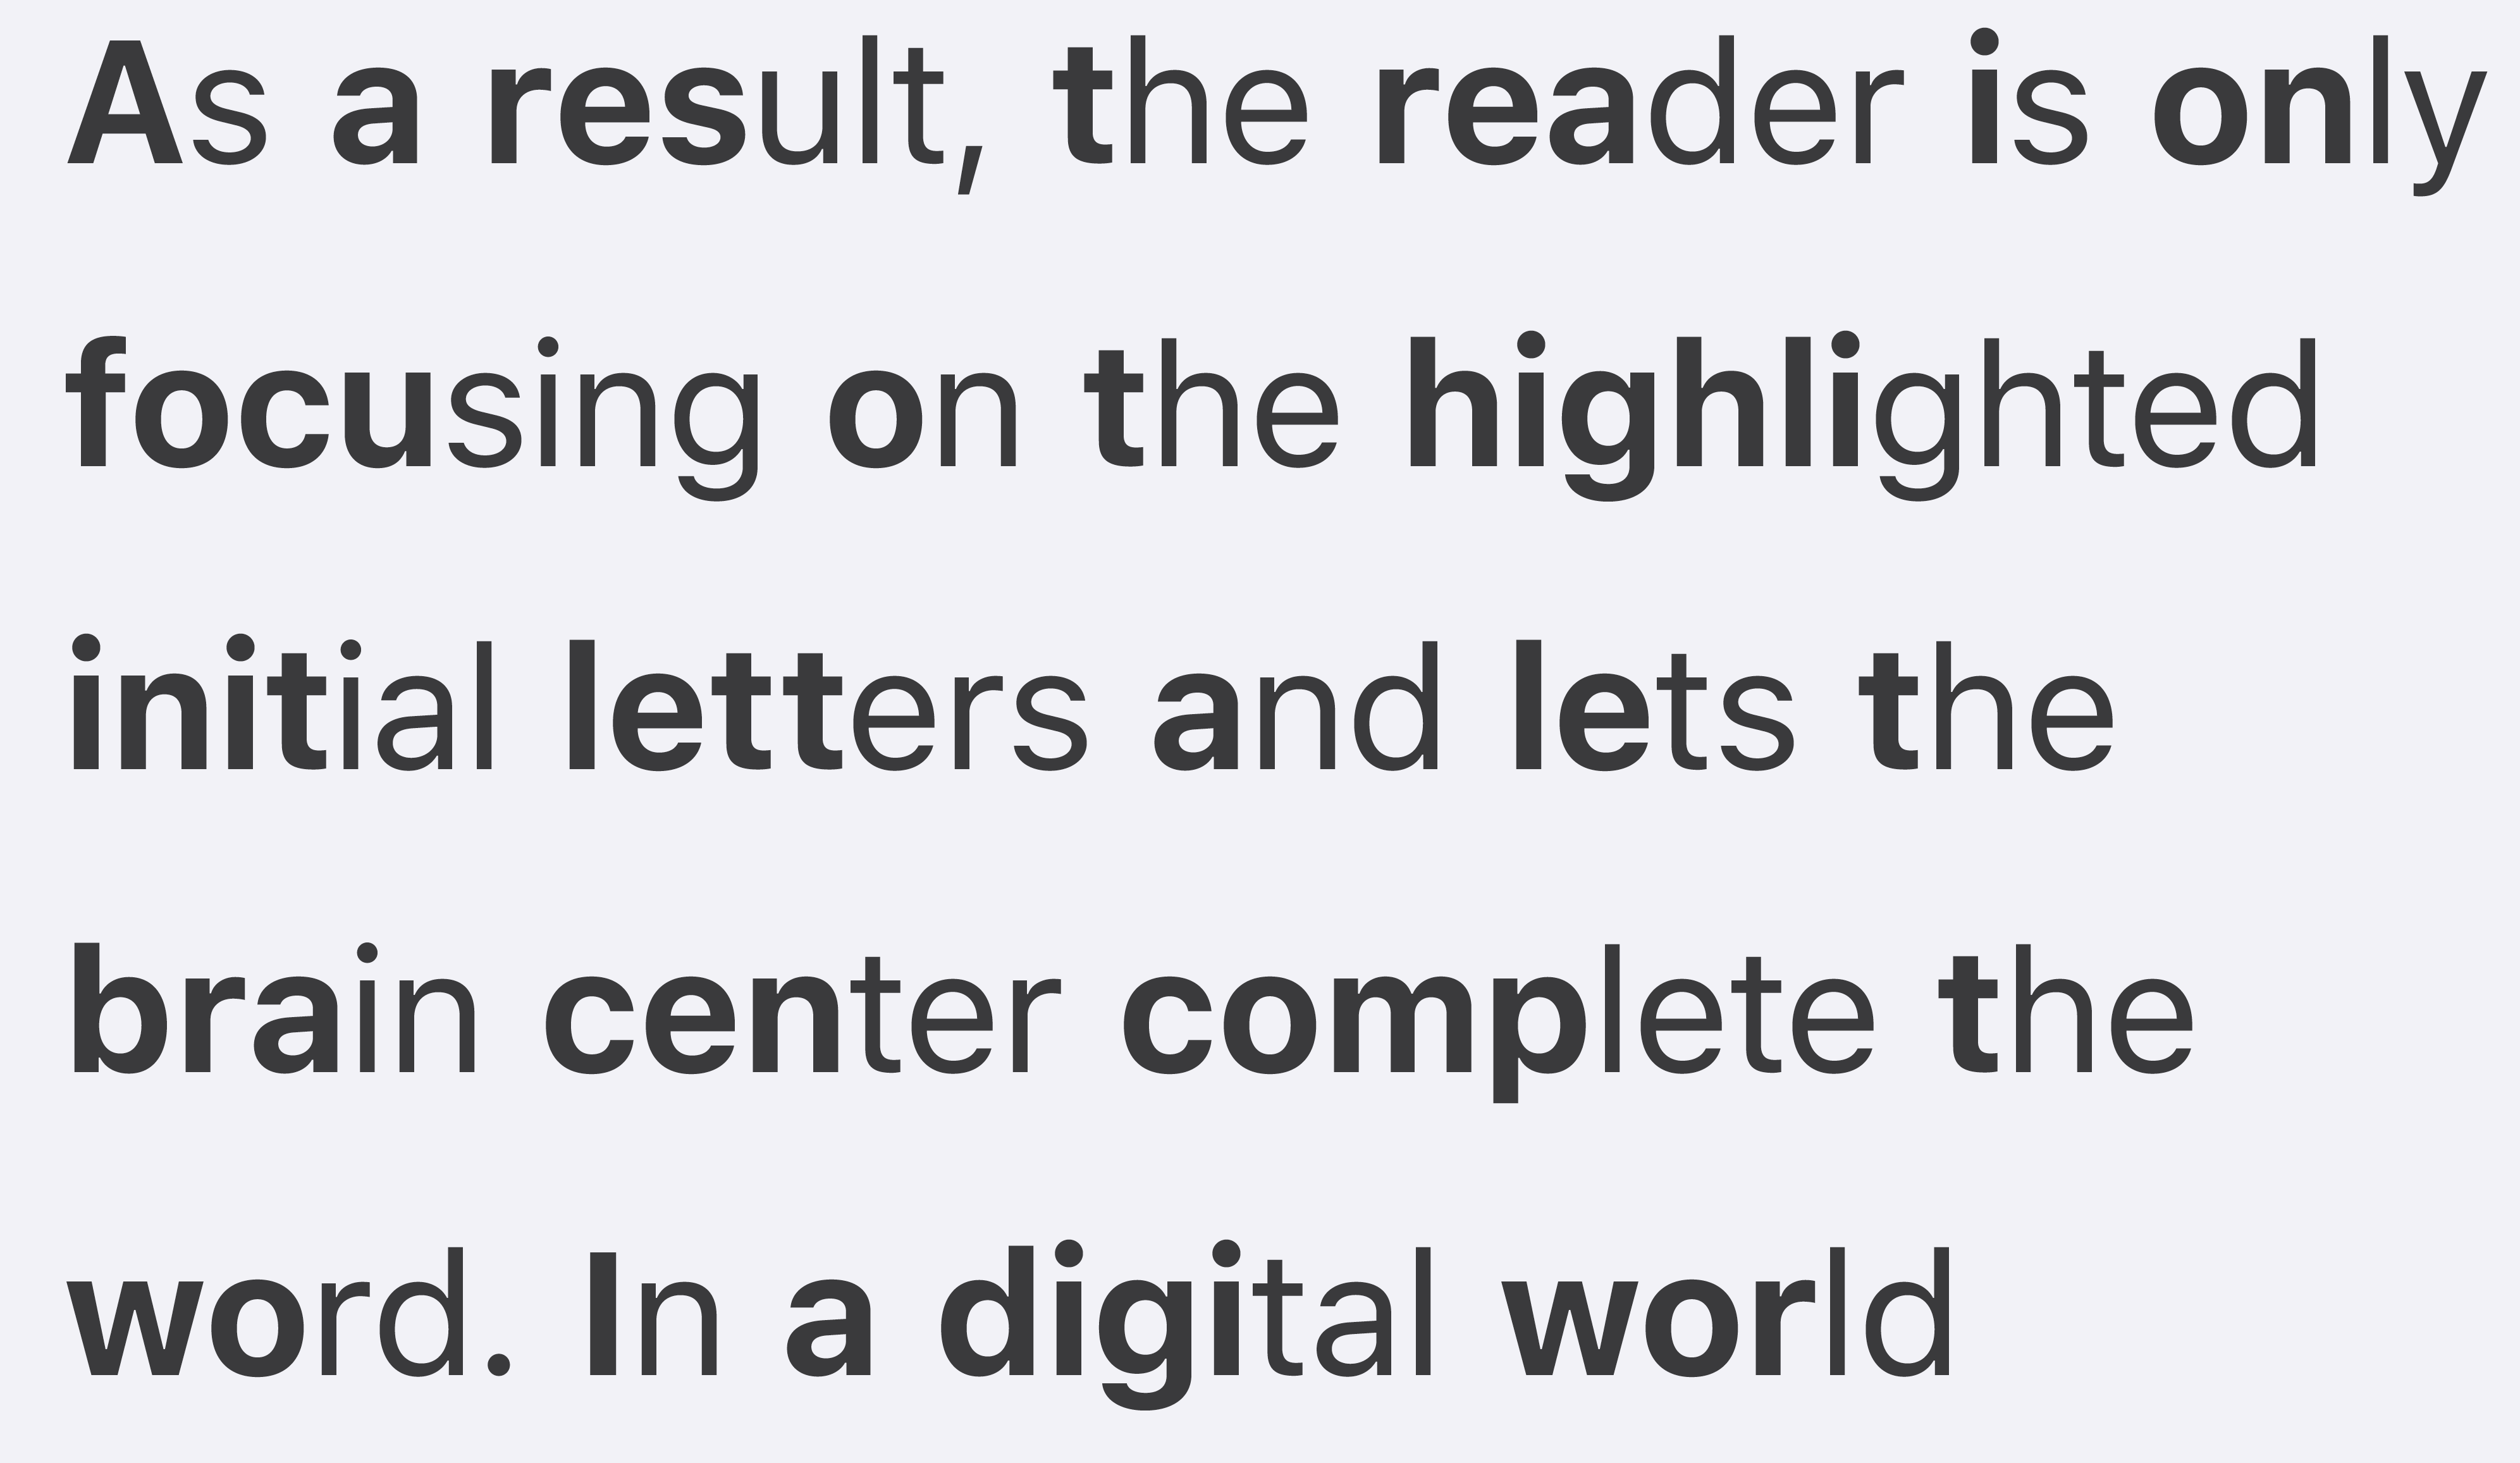
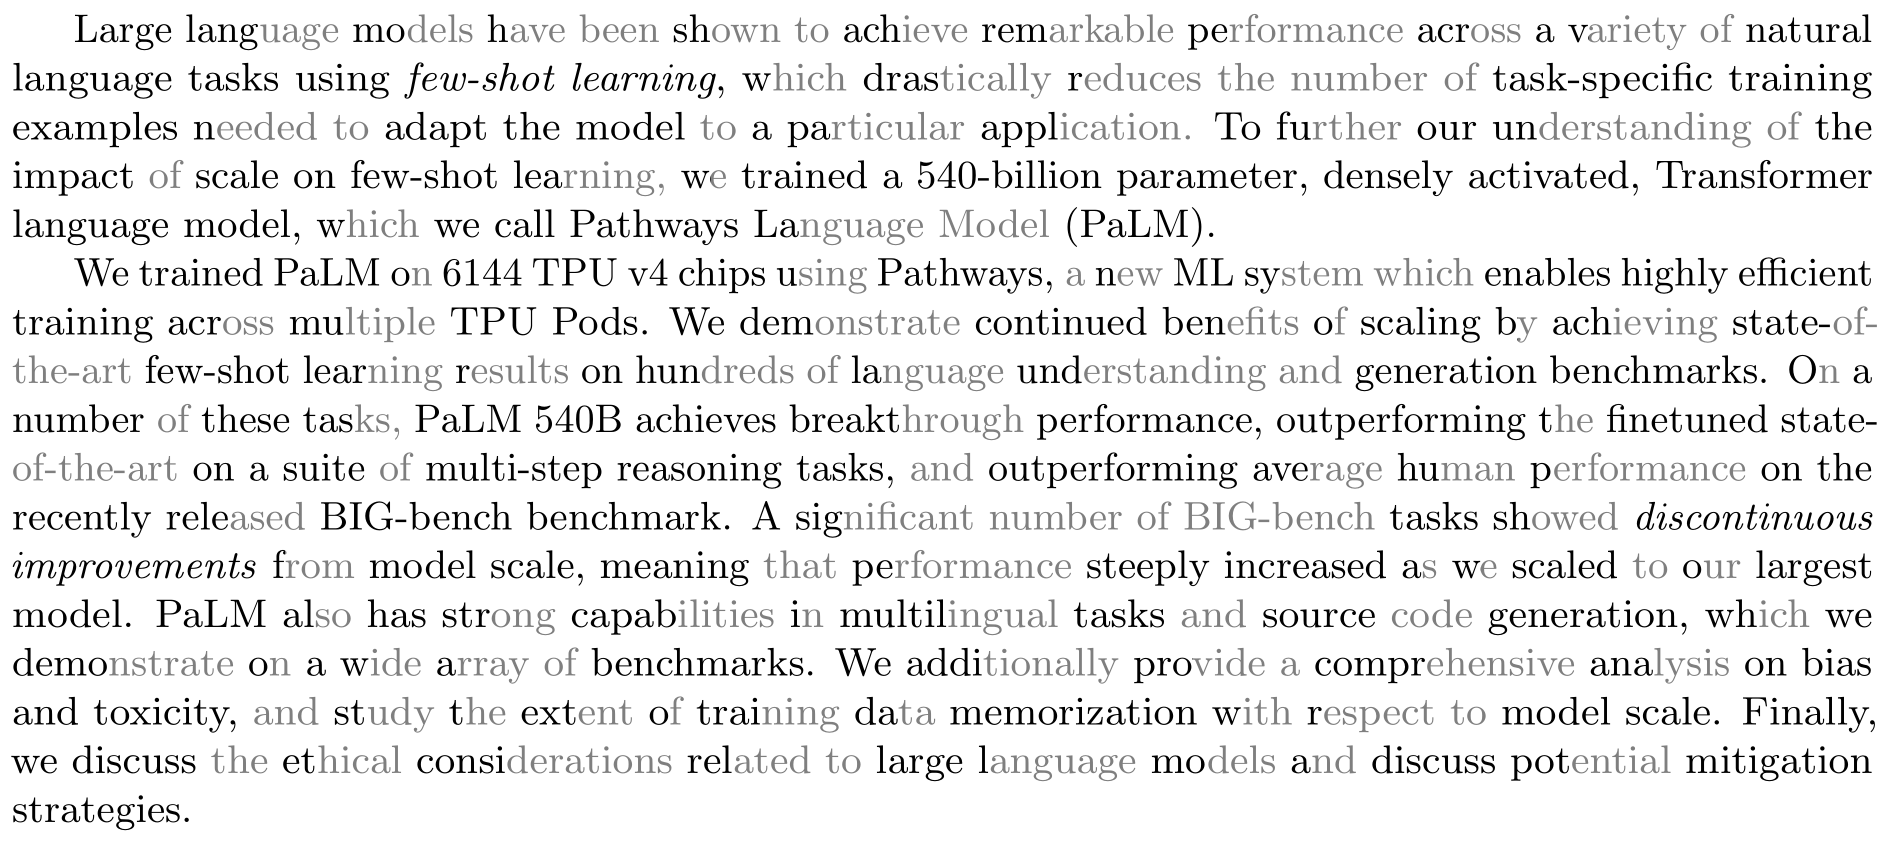
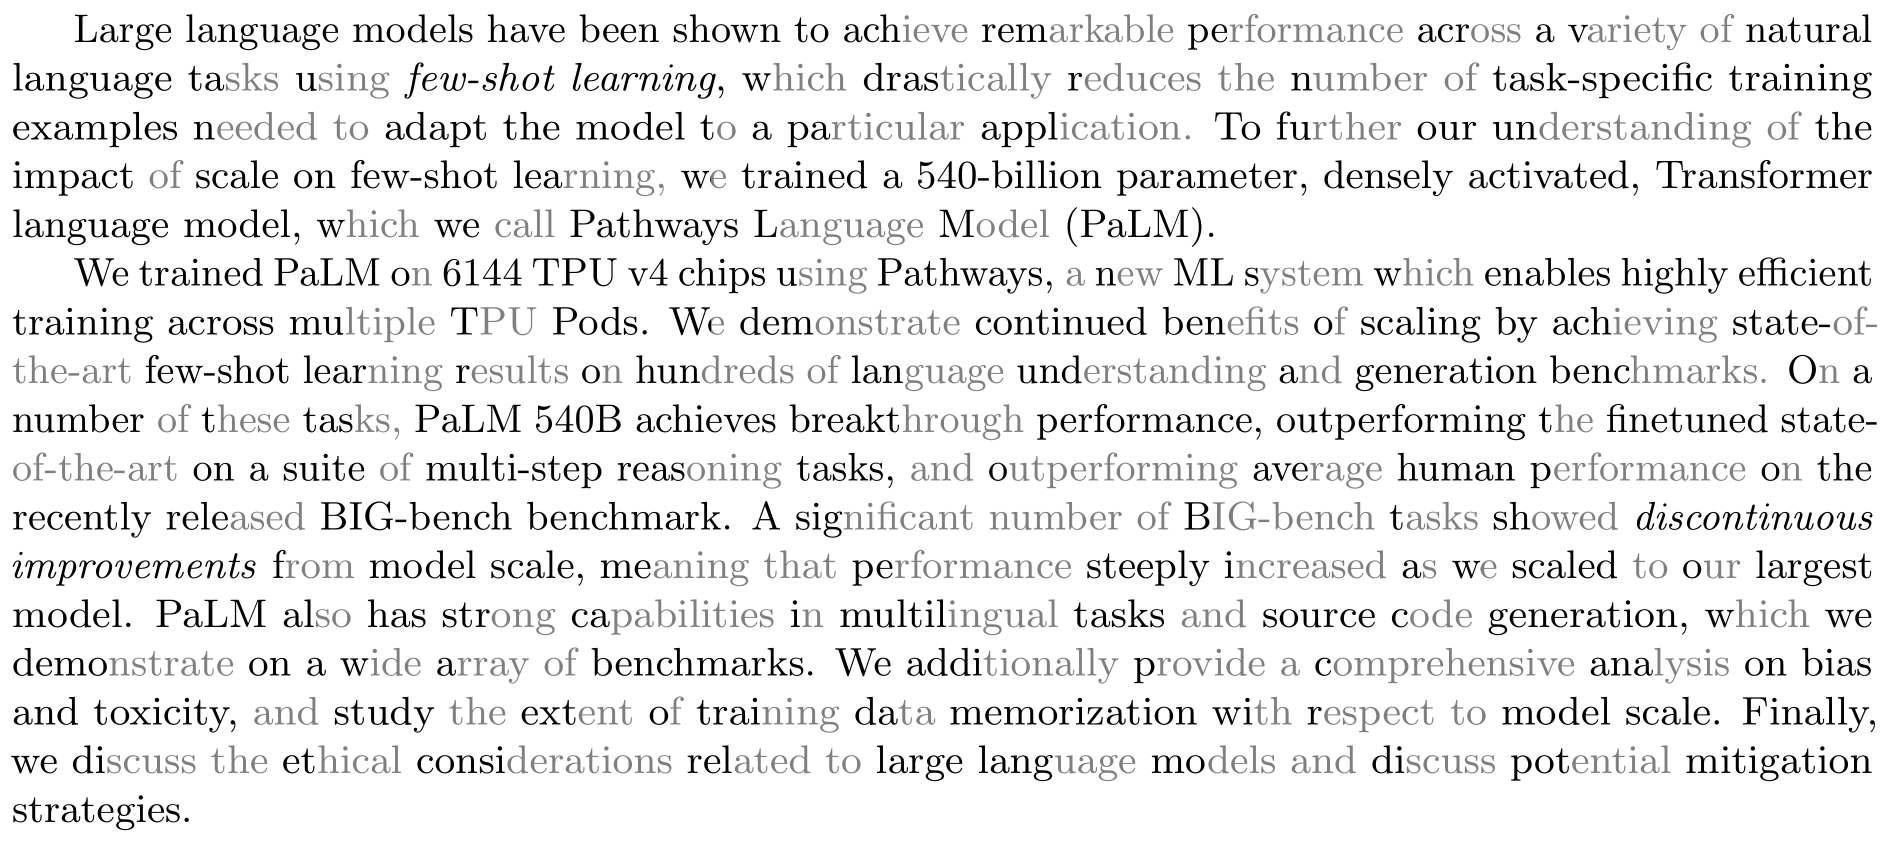
<p>A couple of weeks ago I saw
<a href="https://news.ycombinator.com/item?id=30787290">this</a> hackernews article about
a method of text rendering to increase text readability. The algorithm is
pretty simple: highlight the first few characters of each word (how many
characters depends on the size of the word). Here is a screenshot of what it
looks like from its <a href="https://bionic-reading.com/">website</a>:</p>

<p align="center">
  <img src="/images/2022-04-14-using-languge-models-to-read-faster/bionic2.png" width="50%" />
</p>

<p>That got me thinking: what if instead of using a heuristic method to determine
how many characters to highlight, we used a language model? Specifically we
highlight the character only when the language model fails to predict the
character given its preceding context. Presumably if a language model is smart
enough to predict the character, so are we!</p>

<h2 id="implementation">Implementation</h2>
<p>First of all, we need a character-based language model. I used a
single-character version of <a href="https://arxiv.org/abs/2001.04451">reformer</a> fine
tuned for <code class="language-plaintext highlighter-rouge">enwiki8</code> dataset which is available on
<a href="https://huggingface.co/google/reformer-enwik8">huggingface</a> (as I will mention in the notes section, this is a huge overkill but whatever, this is just an experiment ;) ). Let’s test it:</p>
<div class="language-py highlighter-rouge"><div class="highlight"><pre class="highlight"><code><span class="kn">import</span> <span class="nn">torch</span>
<span class="kn">from</span> <span class="nn">transformers</span> <span class="kn">import</span> <span class="n">ReformerModelWithLMHead</span>

<span class="n">model</span> <span class="o">=</span> <span class="n">ReformerModelWithLMHead</span><span class="p">.</span><span class="n">from_pretrained</span><span class="p">(</span><span class="s">"google/reformer-enwik8"</span><span class="p">)</span>

<span class="c1"># removed for brevity, you can find them on the hugginface repo homepage
</span><span class="k">def</span> <span class="nf">encode</span><span class="p">(</span><span class="n">list_of_strings</span><span class="p">,</span> <span class="n">pad_token_id</span><span class="o">=</span><span class="mi">0</span><span class="p">):</span> <span class="p">...</span>
<span class="k">def</span> <span class="nf">decode</span><span class="p">(</span><span class="n">outputs_ids</span><span class="p">):</span> <span class="p">...</span> 

<span class="k">def</span> <span class="nf">generate_next_char</span><span class="p">(</span><span class="n">text</span><span class="p">,</span> <span class="n">n_chars</span><span class="o">=</span><span class="mi">1</span><span class="p">):</span>
    <span class="k">return</span> <span class="n">decode</span><span class="p">(</span><span class="n">model</span><span class="p">.</span><span class="n">generate</span><span class="p">(</span><span class="n">encode</span><span class="p">([</span><span class="n">text</span><span class="p">])[</span><span class="mi">0</span><span class="p">],</span>
                  <span class="n">max_length</span><span class="o">=</span><span class="nb">len</span><span class="p">(</span><span class="n">text</span><span class="p">)</span><span class="o">+</span><span class="n">n_chars</span><span class="p">))</span>

<span class="o">&gt;&gt;&gt;</span> <span class="n">generate_next_char</span><span class="p">(</span><span class="s">"This is a "</span><span class="p">)</span>
<span class="s">"This is a s"</span>
<span class="o">&gt;&gt;&gt;</span> <span class="n">generate_next_char</span><span class="p">(</span><span class="s">"This is a p"</span><span class="p">)</span>
<span class="s">"This is a pr"</span>
<span class="o">&gt;&gt;&gt;</span> <span class="n">generate_next_char</span><span class="p">(</span><span class="s">"This is a pr"</span><span class="p">)</span>
<span class="s">"This is a pro"</span>
<span class="o">&gt;&gt;&gt;</span> <span class="n">generate_next_char</span><span class="p">(</span><span class="s">"This is a pre"</span><span class="p">)</span>
<span class="s">"This is a prec"</span>
<span class="o">&gt;&gt;&gt;</span> <span class="n">generate_next_char</span><span class="p">(</span><span class="s">"This is a pred"</span><span class="p">)</span>
<span class="s">"This is a prede"</span>
<span class="o">&gt;&gt;&gt;</span> <span class="n">generate_next_char</span><span class="p">(</span><span class="s">"This is a predi"</span><span class="p">)</span>
<span class="s">"This is a predic"</span>
<span class="o">&gt;&gt;&gt;</span> <span class="n">generate_next_char</span><span class="p">(</span><span class="s">"This is a predic"</span><span class="p">)</span>
<span class="s">"This is a predict"</span>
<span class="o">&gt;&gt;&gt;</span> <span class="n">generate_next_char</span><span class="p">(</span><span class="s">"This is a predict"</span><span class="p">)</span>
<span class="s">"This is a predicti"</span>
<span class="o">&gt;&gt;&gt;</span> <span class="n">generate_next_char</span><span class="p">(</span><span class="s">"This is a predicti"</span><span class="p">)</span>
<span class="s">"This is a predictio"</span>
<span class="o">&gt;&gt;&gt;</span> <span class="n">generate_next_char</span><span class="p">(</span><span class="s">"This is a predictio"</span><span class="p">)</span>
<span class="s">"This is a prediction"</span>
</code></pre></div></div>
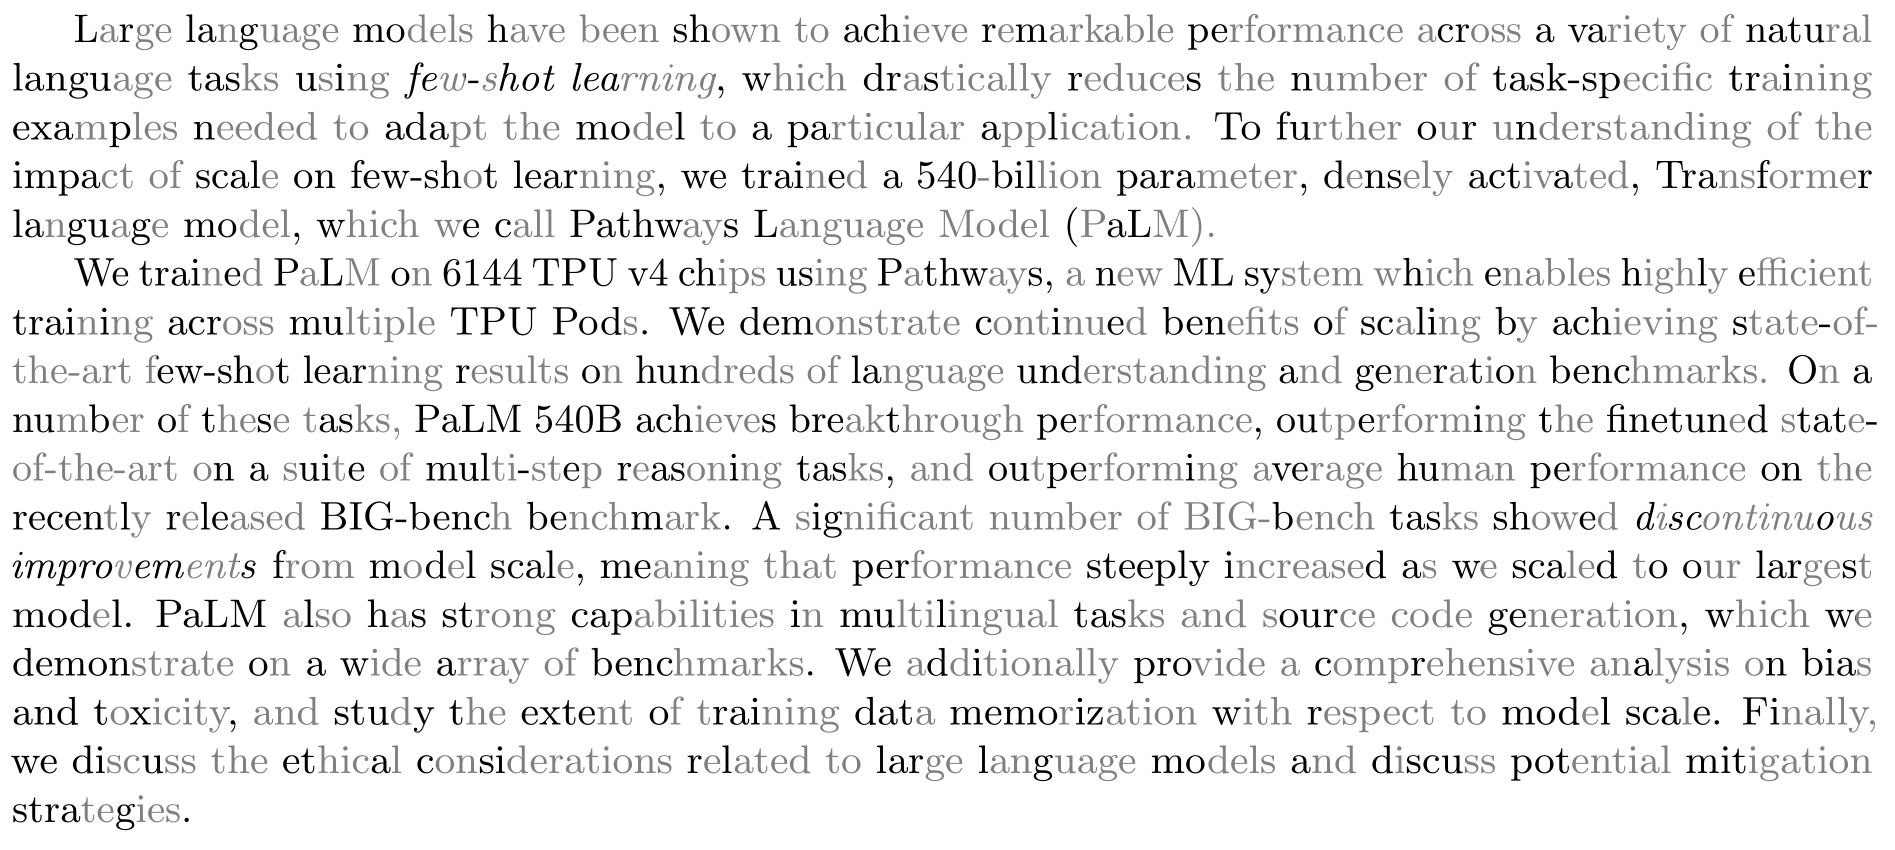
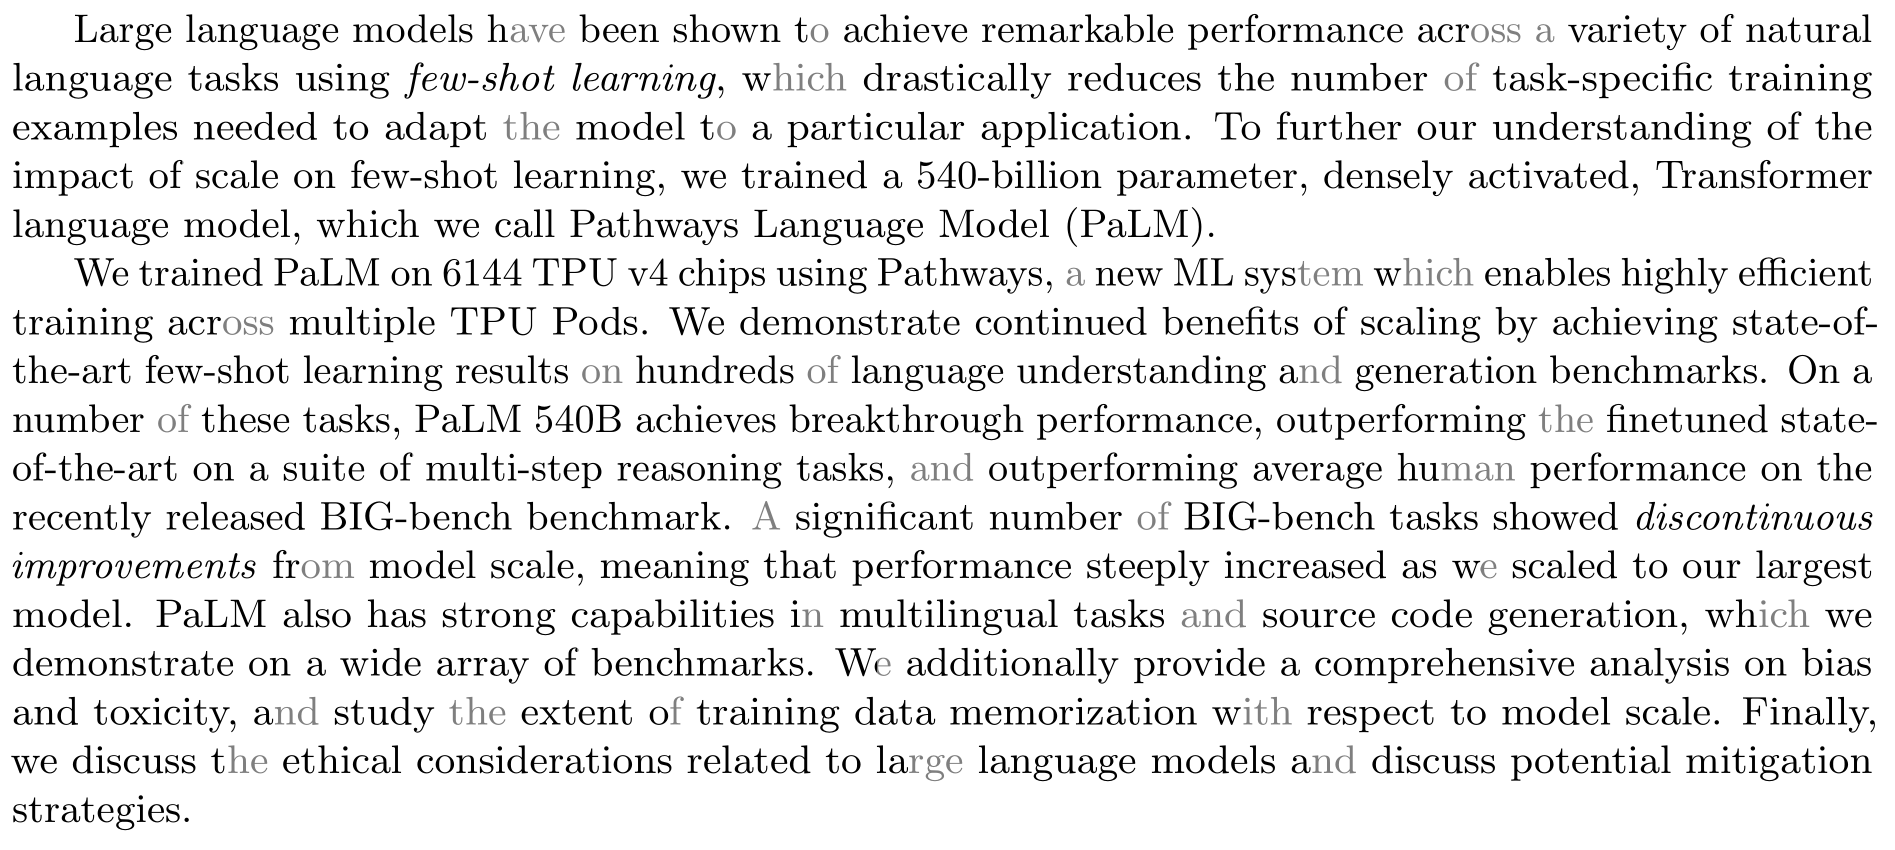
<p>If we wanted to highlight the word “prediction” using the language model, it would look something like this:
<strong>p</strong>r<strong>edi</strong>ction, only the characters which language model got wrong are
highlighted. I implemented this in <a href="https://github.com/ahrm/sioyek">sioyek</a> PDF
reader and the results look like this (if it looks blurry open the image in a new tab and zoom in):</p>

<p align="center">
  <a href="/images/2022-04-14-using-languge-models-to-read-faster/no_refine.png"><img src="/images/2022-04-14-using-languge-models-to-read-faster/no_refine.png" width="100%" /></a>
</p>

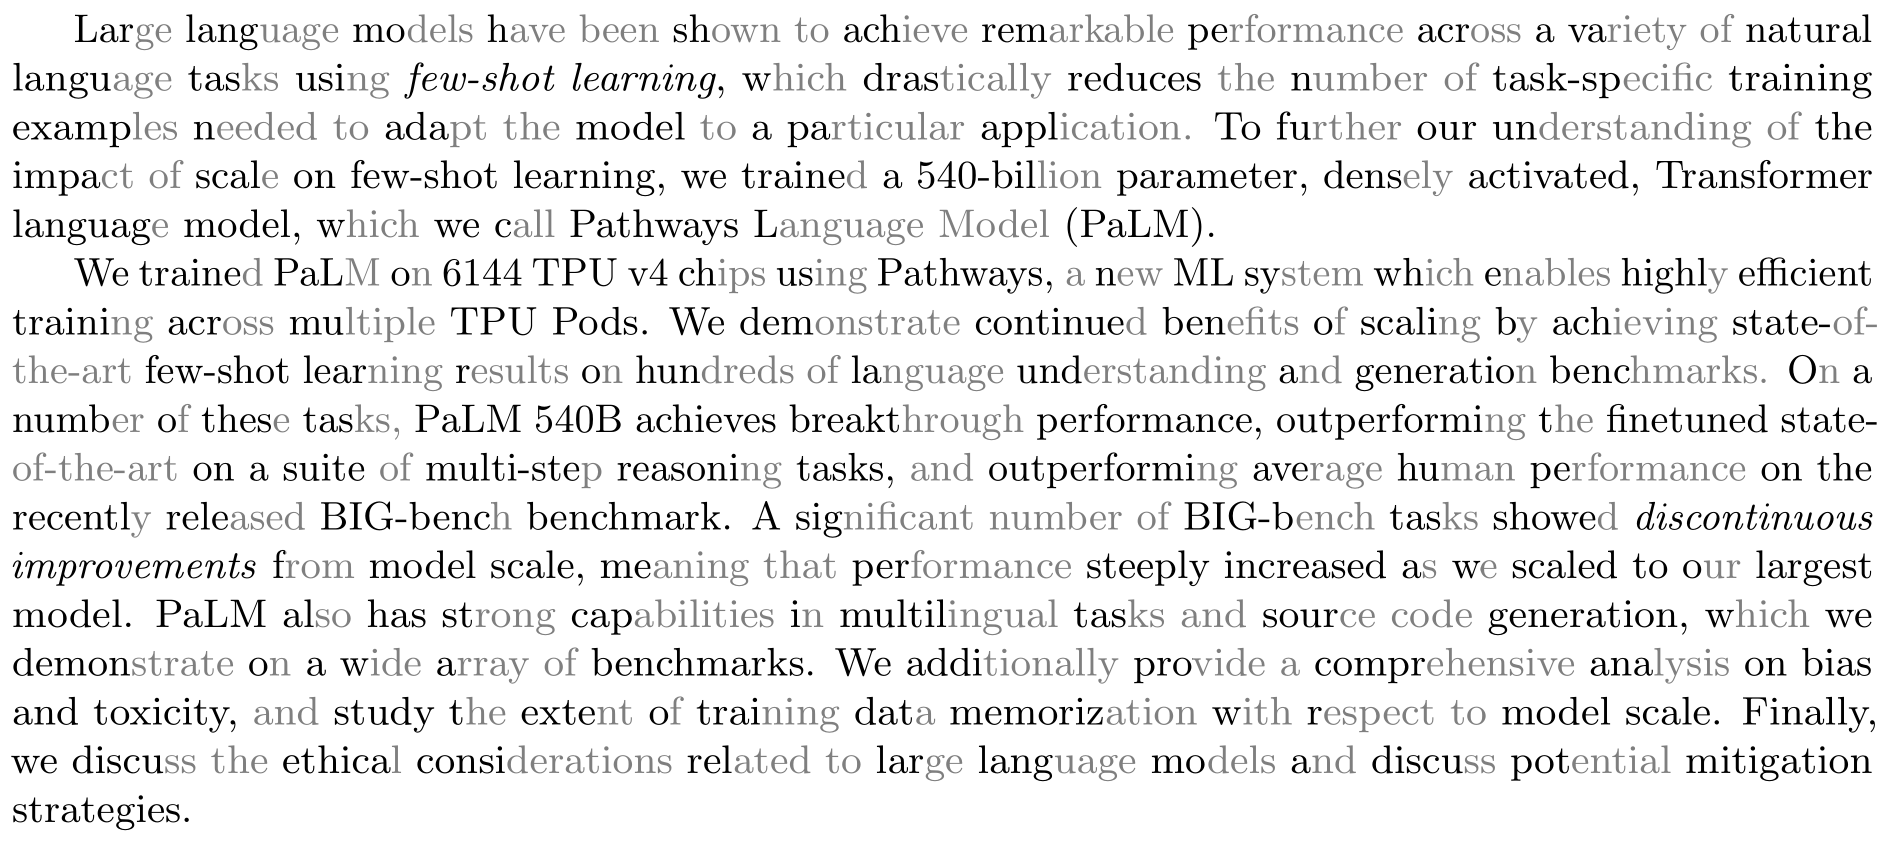
<p>I find sudden highlights in the middle of a word a little off-putting, let’s change it so that a word is highlighted from the begining until the last mispredicted character. Using this scheme, <strong>p</strong>r<strong>edi</strong>ction would become <strong>predi</strong>ction (I call this process <em>refinement</em>). It looks like this in <a href="https://github.com/ahrm/sioyek">sioyek</a>:</p>

<p align="center">
  <a href="/images/2022-04-14-using-languge-models-to-read-faster/refine_no_fill.png"><img src="/images/2022-04-14-using-languge-models-to-read-faster/refine_no_fill.png" width="100%" /></a>
</p>

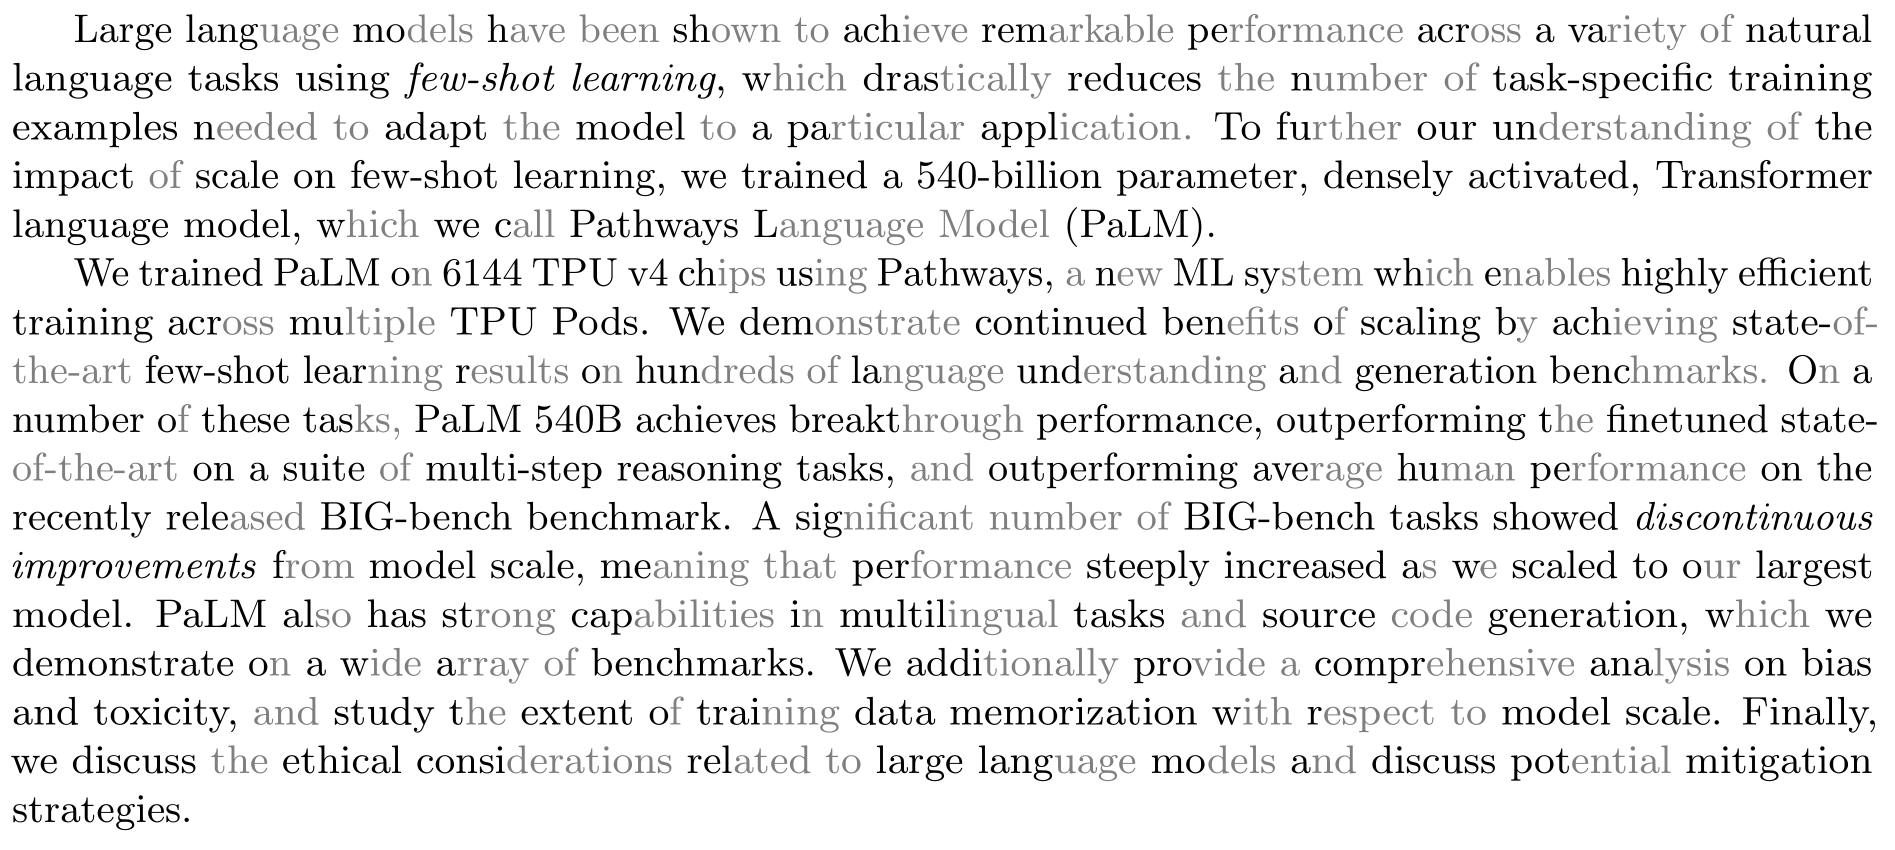
<p>It looks much better, but still words like <strong>continue</strong>d annoy me. If I have already read most of the word, there is little benefit in hiding the rest. So I changed it such that if more than 50% of a word is highlighted, we highlight the entire word (I call this process <em>filling</em>). It looks like this:</p>

<p align="center">
  <a href="/images/2022-04-14-using-languge-models-to-read-faster/refine_and_fill.png"><img src="/images/2022-04-14-using-languge-models-to-read-faster/refine_and_fill.png" width="100%" /></a>
</p>

<p>Here is a comparison of different highlight modes and the original (bionic) heuristic:</p>
<div role="group" aria-label="Basic example" align="center">
  <button class="button-unselected" onclick="method_on_click(this);" id="bionic" type="button">Bionic</button>
  <button class="button-unselected" onclick="method_on_click(this);" id="unrefined" type="button">Unrefined</button>
  <button class="button-unselected" onclick="method_on_click(this);" id="refined" type="button">Refined</button>
  <button class="button-selected" onclick="method_on_click(this);" id="fill" type="button">Refined and Filled</button>
</div>

<p align="center" id="method_comparison">
  <img id="img-refine-and-fill" src="/images/2022-04-14-using-languge-models-to-read-faster/refine_and_fill.png" width="100%" />
  <img id="img-refine-no-fill" src="/images/2022-04-14-using-languge-models-to-read-faster/refine_no_fill.png" width="100%" style="display: none;" />
  <img id="img-heuristic" src="/images/2022-04-14-using-languge-models-to-read-faster/heuristic.png" width="100%" style="display: none;" />
  <img id="img-no-refine" src="/images/2022-04-14-using-languge-models-to-read-faster/no_refine.png" width="100%" style="display: none;" />
</p>

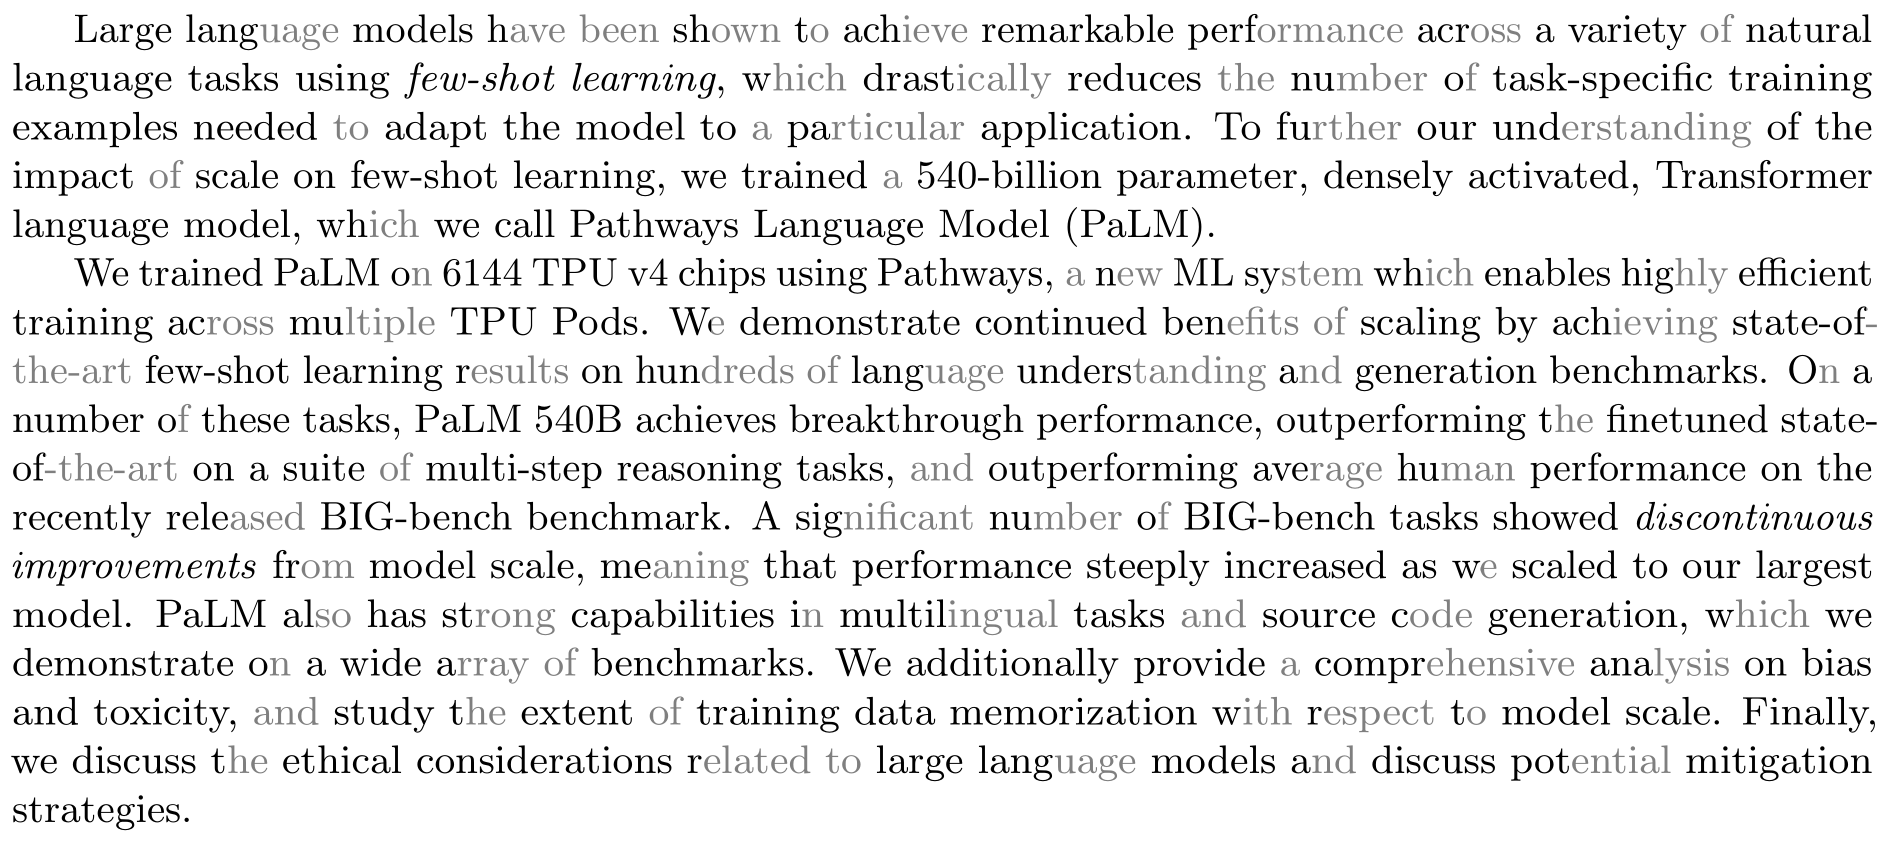
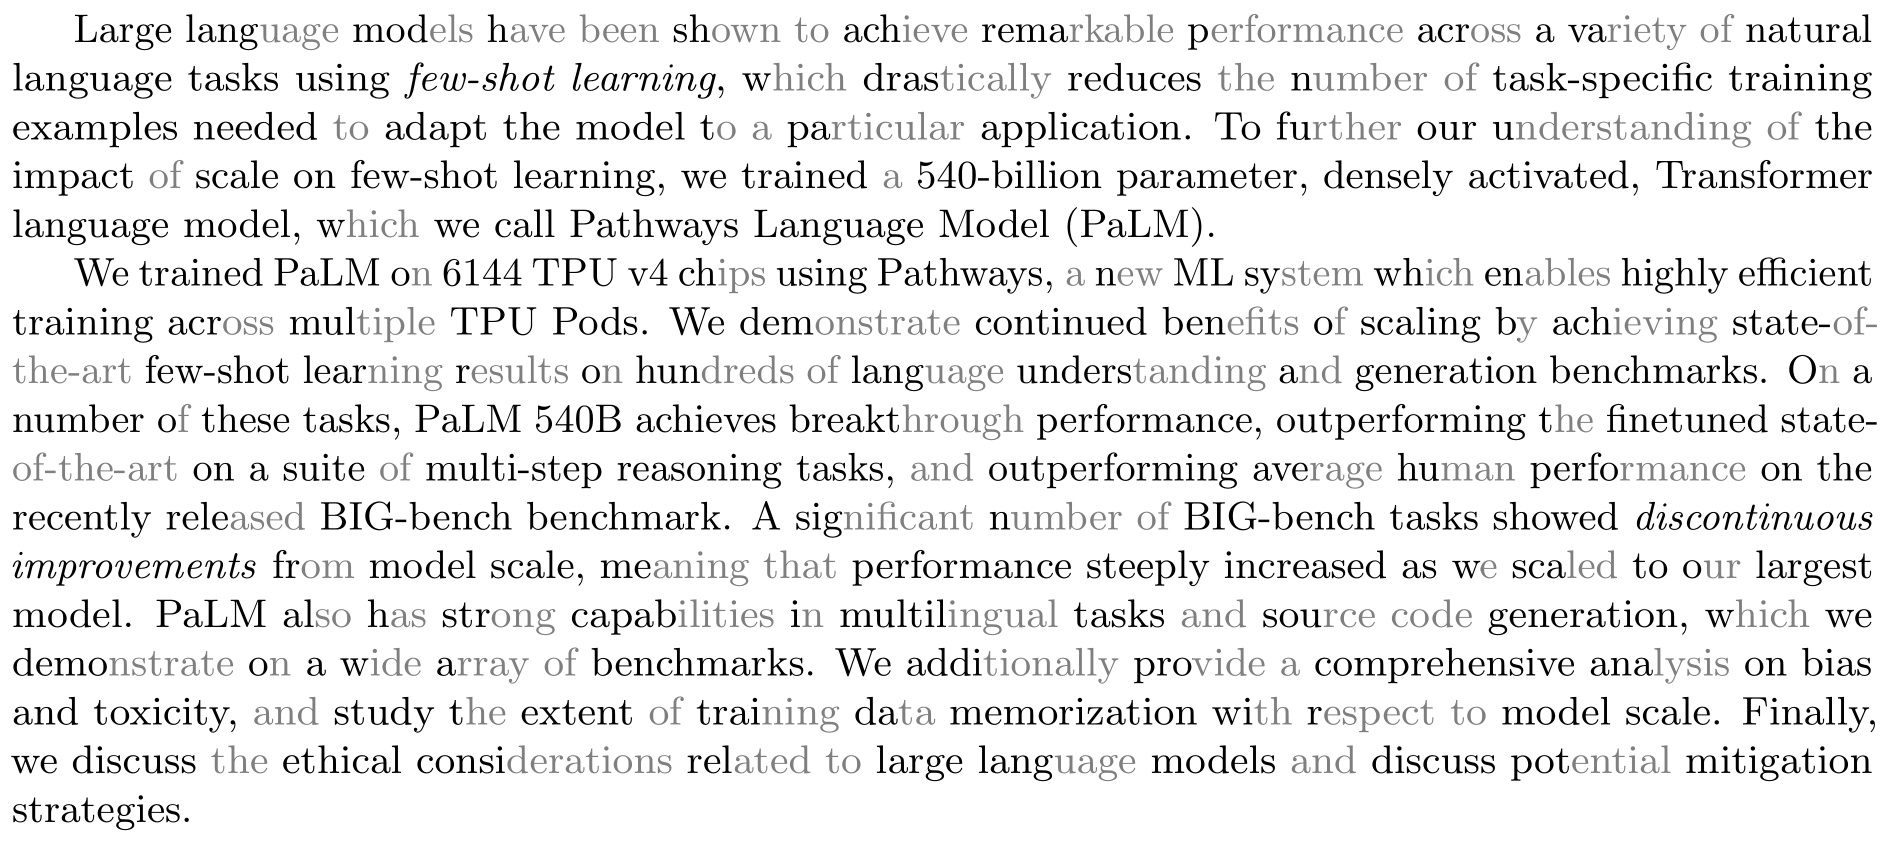
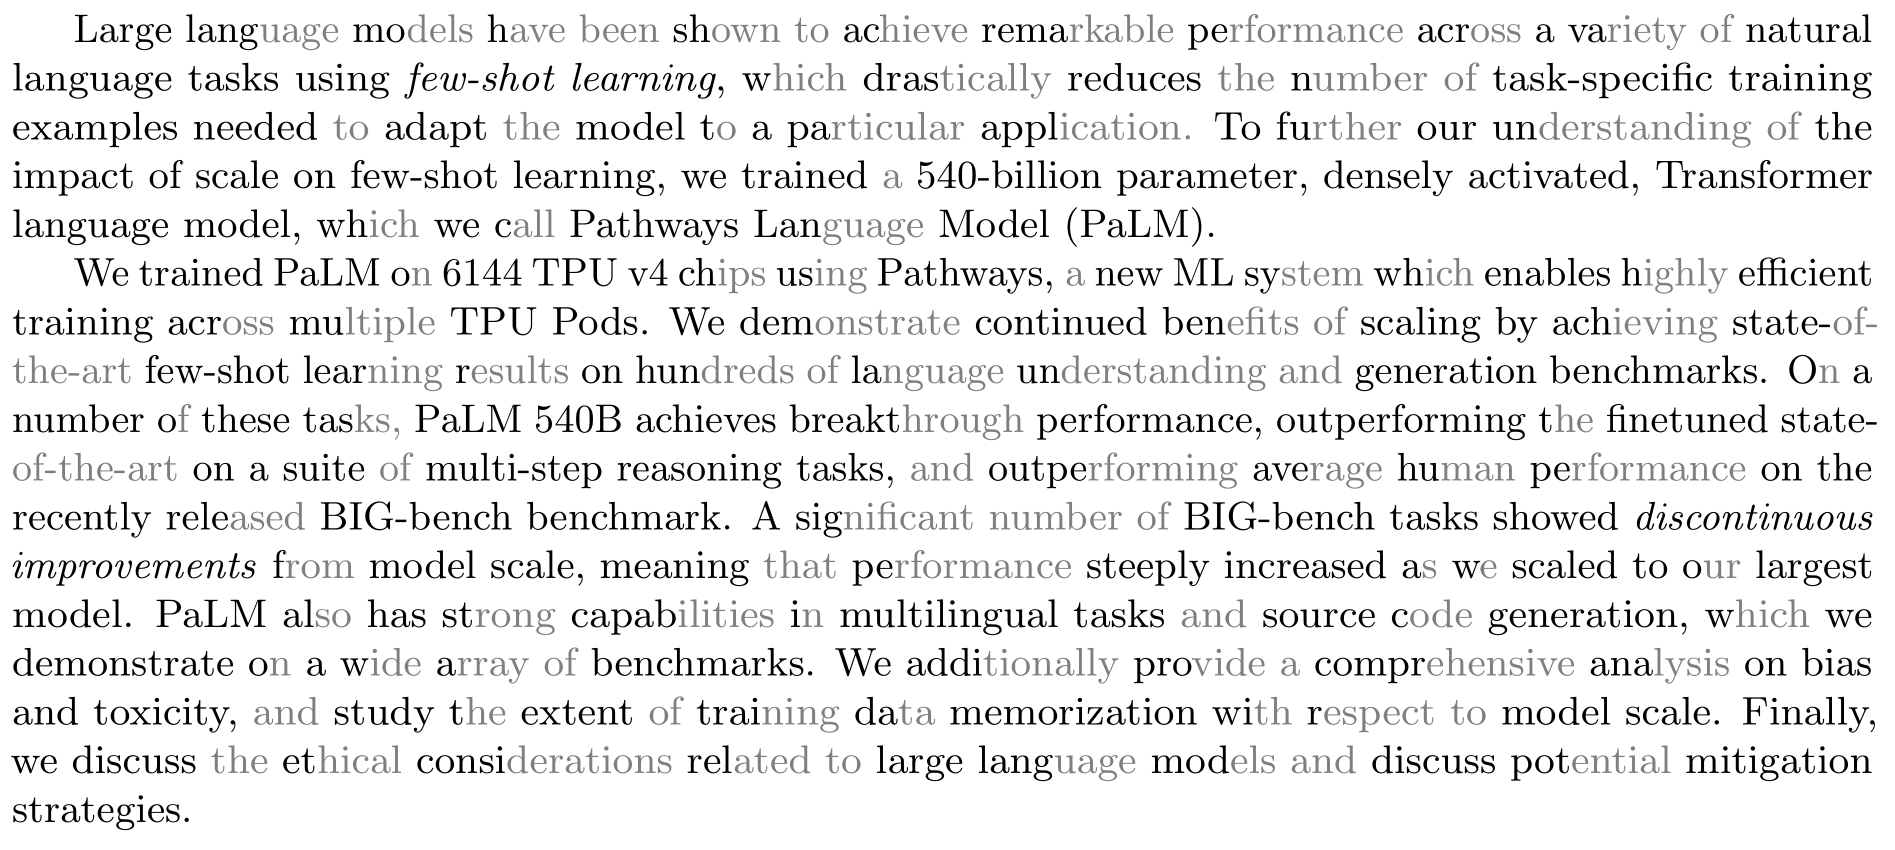
<p>For performance reasons, instead of feeding the entire page from the begining to the point where I want to predict, I only feed the last <code class="language-plaintext highlighter-rouge">n</code> characters before the prediction points. Here is a comparison of the results for different values of <code class="language-plaintext highlighter-rouge">n</code>:</p>

<div role="group" aria-label="Basic example" align="center">
  <button class="button-selected" onclick="context_on_click(this, '5');" id="context_5" type="button">5</button>
  <button class="button-unselected" onclick="context_on_click(this, '10');" id="context_10" type="button">10</button>
  <button class="button-unselected" onclick="context_on_click(this, '20');" id="context_20" type="button">20</button>
  <button class="button-unselected" onclick="context_on_click(this, '40');" id="context_40" type="button">40</button>
  <button class="button-unselected" onclick="context_on_click(this, '80');" id="context_80" type="button">80</button>
  <button class="button-unselected" onclick="context_on_click(this, '160');" id="context_160" type="button">160</button>
</div>

<p align="center" id="context_comparison">
  <img id="img-context-5" src="/images/2022-04-14-using-languge-models-to-read-faster/context_5.png" width="100%" />
  <img id="img-context-10" src="/images/2022-04-14-using-languge-models-to-read-faster/context_10.png" width="100%" style="display: none;" />
  <img id="img-context-20" src="/images/2022-04-14-using-languge-models-to-read-faster/context_20.png" width="100%" style="display: none;" />
  <img id="img-context-40" src="/images/2022-04-14-using-languge-models-to-read-faster/context_40.png" width="100%" style="display: none;" />
  <img id="img-context-80" src="/images/2022-04-14-using-languge-models-to-read-faster/context_80.png" width="100%" style="display: none;" />
  <img id="img-context-160" src="/images/2022-04-14-using-languge-models-to-read-faster/context_160.png" width="100%" style="display: none;" />
</p>

<p>It seems that we reach dimininshing returns at about 30 characters.</p>

<h2 id="enabling-in-sioyek">Enabling in Sioyek</h2>
<p>If you want to try these out on a PDF file, you can download the <a href="https://github.com/ahrm/sioyek/releases/tag/2168768575">latest experimental version of sioyek</a>. Here are the relevant configurations:</p>
<ul>
  <li><code class="language-plaintext highlighter-rouge">text_summary_url</code>: The url of the server which provides the summary. I did not include the server in sioyek itself because I did’nt want to bundle the entire pytorch with sioyek for an experimental feature. Instead I created a python script which runs a local server providing this feature. You can find the script <a href="https://github.com/ahrm/sioyek/blob/main/scripts/summary_highlight_server.py">here</a>. The default value is <code class="language-plaintext highlighter-rouge">http://localhost:5000/</code> which is the default port of the script, so if you don’t change the script you don’t have to set this value.</li>
  <li><code class="language-plaintext highlighter-rouge">text_summary_should_refine</code>: 1 if you want refinement and 0 otherwise</li>
  <li><code class="language-plaintext highlighter-rouge">text_summary_should_fill</code>: 1 if you want filling and 0 otherwise</li>
  <li><code class="language-plaintext highlighter-rouge">text_summary_context_size</code>: number of characters in context for next character prediction</li>
</ul>

<p>For example here is the relevant parts in my <code class="language-plaintext highlighter-rouge">prefs_user.config</code>:</p>
<div class="language-sh highlighter-rouge"><div class="highlight"><pre class="highlight"><code>text_summary_should_refine 1
text_summary_should_fill 1
text_summary_context_size 40
</code></pre></div></div>

<p>Of course we have default values for all of these configs so you don’t have to change anything if you are comfortable with the default settings.</p>

<p>Now, in order to use this feature, run the <code class="language-plaintext highlighter-rouge">summary_highlight_server.py</code> script and then enable highlights in sioyek by executing <code class="language-plaintext highlighter-rouge">toggle_fastread</code> command (press <code class="language-plaintext highlighter-rouge">:</code> and type <code class="language-plaintext highlighter-rouge">toggle_fastread</code>, it may take a few seconds to compute highlights depending on your GPU).</p>

<h2 id="notes-and-improvements">Notes and Improvements</h2>
<ul>
  <li>I don’t have any data on whether this actually improves reading speed or not.
But in my own subjective experience, I think it does.</li>
  <li>Currently this is too GPU-intensive to be deployed. Of course using a
full-fledged language model for this task is overkill. Also, as mentioned in
huggingface repo page, this model is not optimized for language generation.
Probably the best option would be a relatively small RNN language model,
however, I could not find any decent pre-trained character-based RNN language
models and I don’t have the resources to train it myself. Even simpler
non-neural network models are probably good enough.</li>
  <li>One limitation of this approach is that we don’t consider the future context
to determine whether to remove a word. For example consider the snippet
“task-specific training examples” (in our examples all three words were
highlighted). But maybe if we knew that we were going to include both
“task-specific” and “examples” then a language model could predict that the
middle word in “task-specific [MASK] examples” is “training” with high
probability and we could unhighlight the word “training”. However, this is
probably too computationally intensive to be worth it.</li>
  <li>Is it possible to use language models that use non-character tokens for this
task? That would help a lot since most pre-trained language models are not
character-based.</li>
</ul>]]></content><author><name></name></author><category term="jekyll" /><category term="update" /><summary type="html"><![CDATA[]]></summary></entry><entry><title type="html">Using LF file manager on windows</title><link href="/jekyll/update/2022/04/02/using-lf-file-manager-on-windows.html" rel="alternate" type="text/html" title="Using LF file manager on windows" /><published>2022-04-02T11:15:21+00:00</published><updated>2022-04-02T11:15:21+00:00</updated><id>/jekyll/update/2022/04/02/using-lf-file-manager-on-windows</id><content type="html" xml:base="/jekyll/update/2022/04/02/using-lf-file-manager-on-windows.html"><![CDATA[<p><img src="/images/2022-04-02-using-lf-file-manager-on-windows/lf_main.jpeg" alt="" /></p>

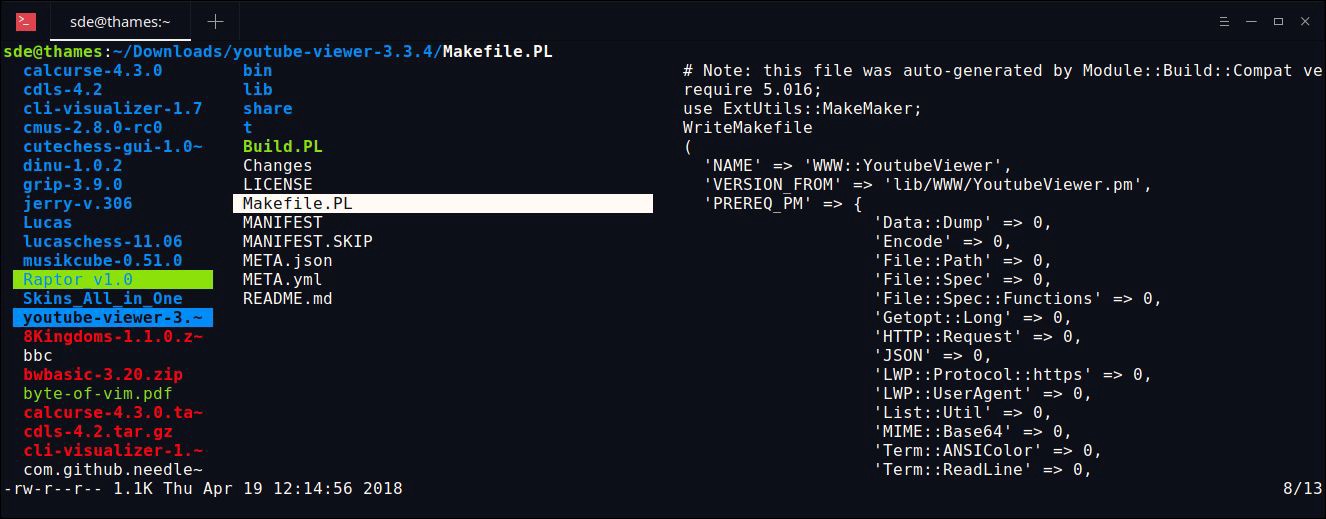
<p><a href="https://github.com/gokcehan/lf"><code class="language-plaintext highlighter-rouge">lf</code></a> is an extremely fast and customizable terminal file manager for windows, mac and linux. By default <code class="language-plaintext highlighter-rouge">lf</code> doesn’t have many features that you might expect from a file manager (for example archiving and unarchiving files), but provides a powerful interface for the user to add these features themselves. Of course, the <a href="https://pkg.go.dev/github.com/gokcehan/lf">documentation</a> has a long list of recipes for most common features that a user might want to add. However, the documentation and the tooling surrounding <code class="language-plaintext highlighter-rouge">lf</code> is mostly focused on linux, and setting it up on windows requires some modifications to the recipes provided in the documentation. In this post I will explain my journey to make lf the perfect file manager in windows. You can download all of the files and scripts detailed in this post <a href="https://github.com/ahrm/dotfiles/tree/main/lf-windows">here</a>. Note that these script are not meant to be copied verbatim (for example they contain some hard-coded paths which you may need to modify).</p>

<h2 id="prequisites">Prequisites</h2>

<p>I will not describe the basics of using lf in this post, the <a href="https://github.com/gokcehan/lf/wiki/Tutorial">documentation </a>has done an excellent job of that. I assume you are already familiar with the basics of lf.</p>

<p>In order to run all of the commands and scripts in this post, you will need python3, <a href="https://github.com/junegunn/fzf/releases/tag/0.29.0"><code class="language-plaintext highlighter-rouge">fzf</code></a>, <a href="https://www.7-zip.org/"><code class="language-plaintext highlighter-rouge">7zip</code></a>and <a href="https://www.msys2.org/"><code class="language-plaintext highlighter-rouge">msys2</code></a>. You will also need the following packages for python:</p>

<ul>
  <li>
    <p><code class="language-plaintext highlighter-rouge">Pillow</code></p>
  </li>
  <li>
    <p><code class="language-plaintext highlighter-rouge">mupdf</code></p>
  </li>
  <li>
    <p><code class="language-plaintext highlighter-rouge">tkinter</code></p>
  </li>
  <li>
    <p><code class="language-plaintext highlighter-rouge">tkinterdnd2</code></p>
  </li>
</ul>

<p>You can install all these packages using pip.</p>

<h2 id="navigating-the-drives">Navigating the drives</h2>

<p>As far as I know, by default in order to navigate to another drive in lf you have to type something like this: <code class="language-plaintext highlighter-rouge">:cd ‘D:\’</code> which is a lot of keystrokes for something as common as this. So I placed a mark with the name name at the root of each drive. For example after navigating to drive D, I marked it by pressing md and now I can jump to it by pressing <code class="language-plaintext highlighter-rouge">‘d</code>.</p>

<h2 id="basic-utilities">Basic Utilities</h2>

<p>Here we we configure renaming, quick reloading and other utilities (put the contents into your lfrc file)</p>

<div class="language-plaintext highlighter-rouge"><div class="highlight"><pre class="highlight"><code>set filesep " "

# quick rename using r
cmd rename %sh -c 'mv -i %f% $0'
map r push :rename&lt;space&gt;

# reload config file using f5
map &lt;f-5&gt; push :source&lt;space&gt;C:/Users/Lion/AppData/Local/lf/lfrc&lt;enter&gt;

# use a and A to create files and directories
cmd createfile %sh -c 'touch $0'
cmd createdir %sh -c 'mkdir $0'
map a push :createfile&lt;space&gt;
map A push :createdir&lt;space&gt;

# open explorer in current directory
map S push &amp;start.&lt;enter&gt;

# copy file path
map Y %echo %fx% | clip 

# open file in nvim
map V &amp;nvim-qt %f%

# archive management
cmd zip %sh -c '7z a $0 %fx%'
cmd extract_here %sh -c '7z e %f%'
cmd extract_to %sh -c '7z e %f% -o$0'
</code></pre></div></div>

<h2 id="fuzzy-file-search-using-fzf">Fuzzy file search using <code class="language-plaintext highlighter-rouge">fzf</code></h2>

<p>lf wiki has a <a href="https://github.com/gokcehan/lf/wiki/Integrations#fzf">section</a> for <code class="language-plaintext highlighter-rouge">fzf</code> integration, however the commands specified there are for linux and need some modification in order to work on windows. Which I have done and they are available <a href="https://github.com/ahrm/dotfiles/tree/main/lf-windows/lf_scripts">here</a>. Just copy <a href="https://github.com/ahrm/dotfiles/blob/main/lf-windows/lf_scripts/findfzf.bat">findfzf.bat</a> and <a href="https://github.com/ahrm/dotfiles/blob/main/lf-windows/lf_scripts/fzfpy.py">fzfpy.py</a> on your system and add the following to your <code class="language-plaintext highlighter-rouge">lfrc</code>.</p>

<div class="language-plaintext highlighter-rouge"><div class="highlight"><pre class="highlight"><code># use c-f to fuzzy search
cmd fzf_jump push $python&lt;space&gt;D:/lf_scripts/fzfpy.py&lt;space&gt;%id%&lt;enter&gt;
map &lt;c-f&gt; :fzf_jump
</code></pre></div></div>

<p>Of course, you have to replace <code class="language-plaintext highlighter-rouge">D:/lf_scripts/fzfpy.py</code> with the location of the file on your system (note that you probably need to edit <code class="language-plaintext highlighter-rouge">findfzf.bat</code> and specify the correct path of find.exe in your <code class="language-plaintext highlighter-rouge">msys2</code> installation).</p>

<h2 id="drag-and-drop">Drag and Drop</h2>

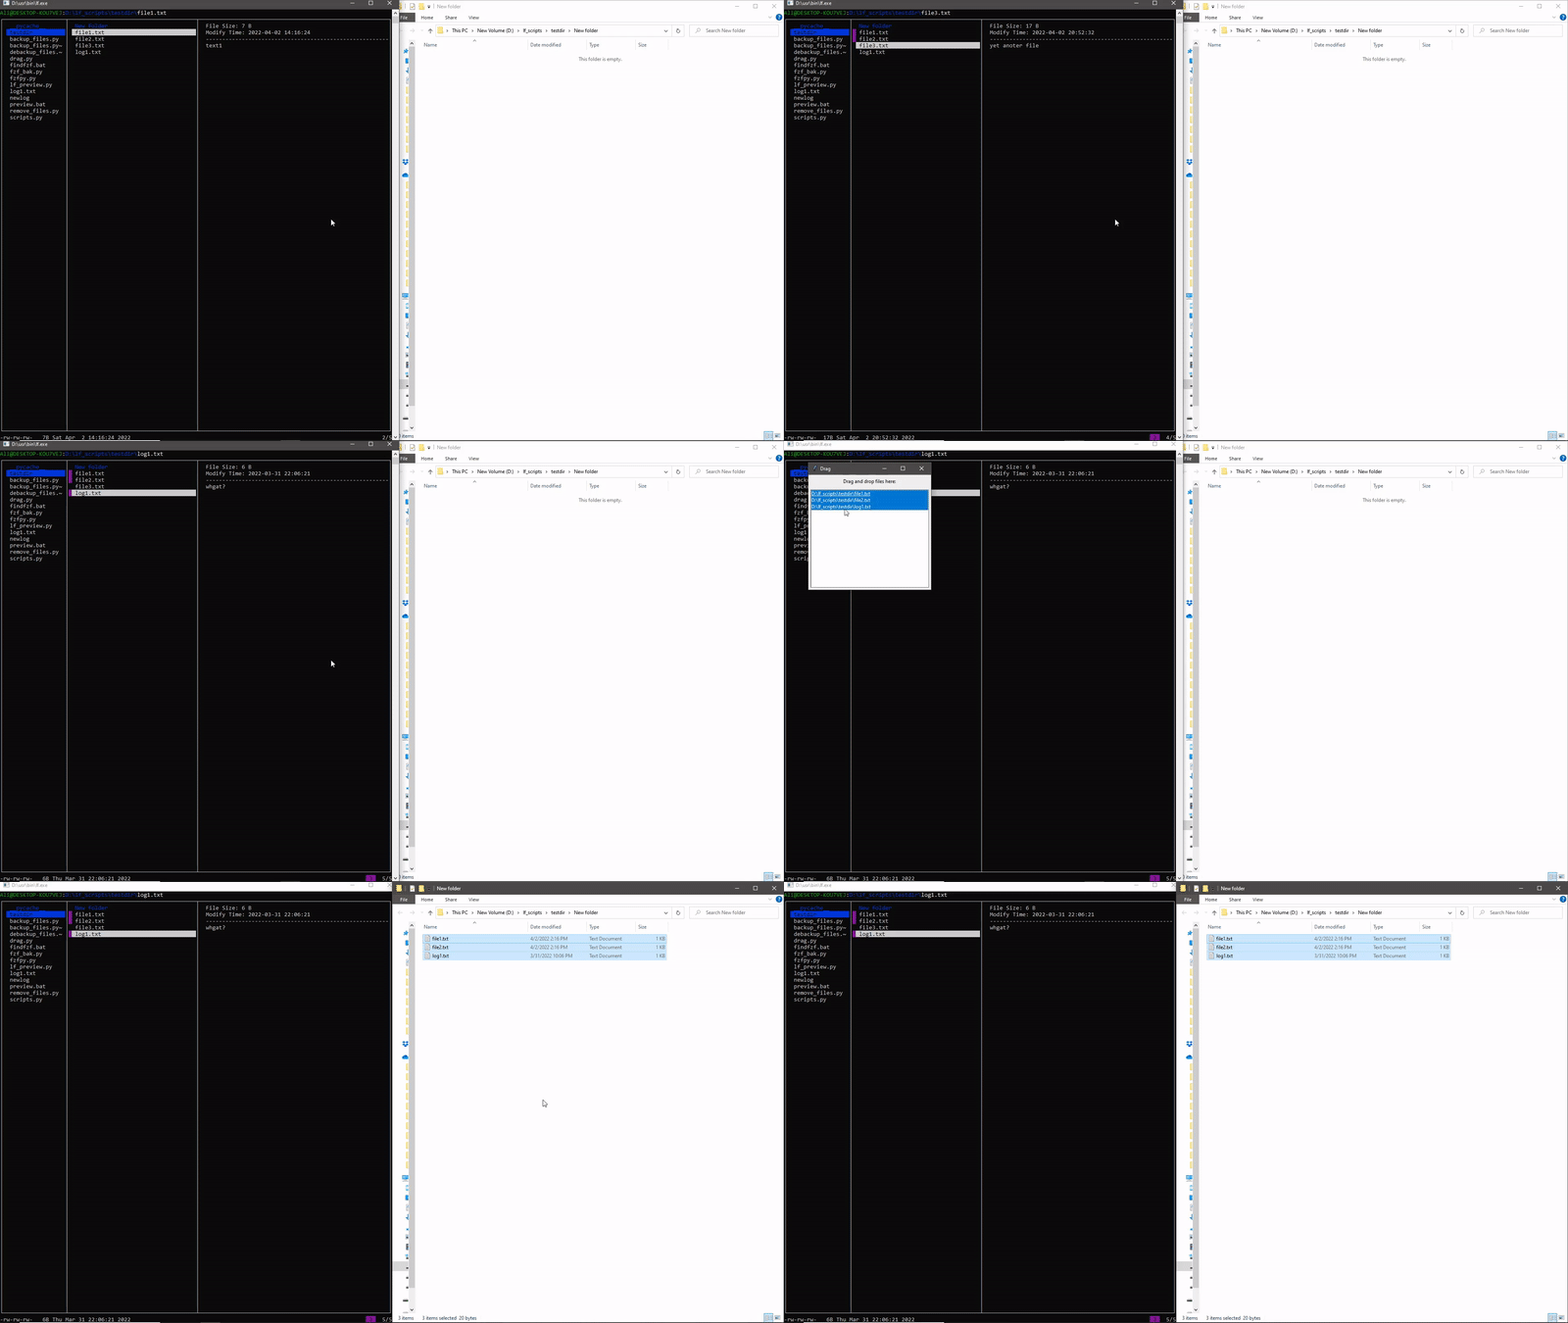
<p>Being a terminal application, <code class="language-plaintext highlighter-rouge">lf</code> does not support drag and drop. However, some applications are impossible to use or very inconvenient without drag and drop. I wrote a <a href="https://github.com/ahrm/dotfiles/blob/main/lf-windows/lf_scripts/drag.py">script</a> to add drag and drop functionality, just copy the script to your system and add the following to your <code class="language-plaintext highlighter-rouge">lfrc</code> (again, you have to modify the paths to point to your file locations).</p>

<div class="language-plaintext highlighter-rouge"><div class="highlight"><pre class="highlight"><code># drag and drop
cmd drag push &amp;python&lt;space&gt;D:/lf_scripts/drag.py&lt;space&gt;multi&lt;space&gt;%fx%&lt;enter&gt;

# close the drag window after one use
cmd dragonce push 
&amp;python&lt;space&gt;D:/lf_scripts/drag.py&lt;space&gt;once&lt;space&gt;%fx%&lt;enter&gt;
map D push :dragonce&lt;enter&gt;
</code></pre></div></div>

<p>Here is how it looks like:</p>

<p><img src="https://cdn-images-1.medium.com/max/2000/1*eQ1jzuO9jkN1C5jJWekGvw.gif" alt="Drag and Drop in lf" /></p>

<h2 id="file-preview">File Preview</h2>

<p>lf is a 3 panel file manager: left panel shows the parent directory, middle panel shows the current directory and the right panel shows the contents of selected directory. If the selected item is a file instead of a directory, lf can show a preview of file on the right panel. By default it does so only for text files. I have written a preview script that displays some useful information for other file types. These include:</p>

<ul>
  <li>
    <p>File size and last modify date for all files</p>
  </li>
  <li>
    <p>Image dimensions for image files</p>
  </li>
  <li>
    <p>Number of pages and text content of the first page for PDF files</p>
  </li>
</ul>

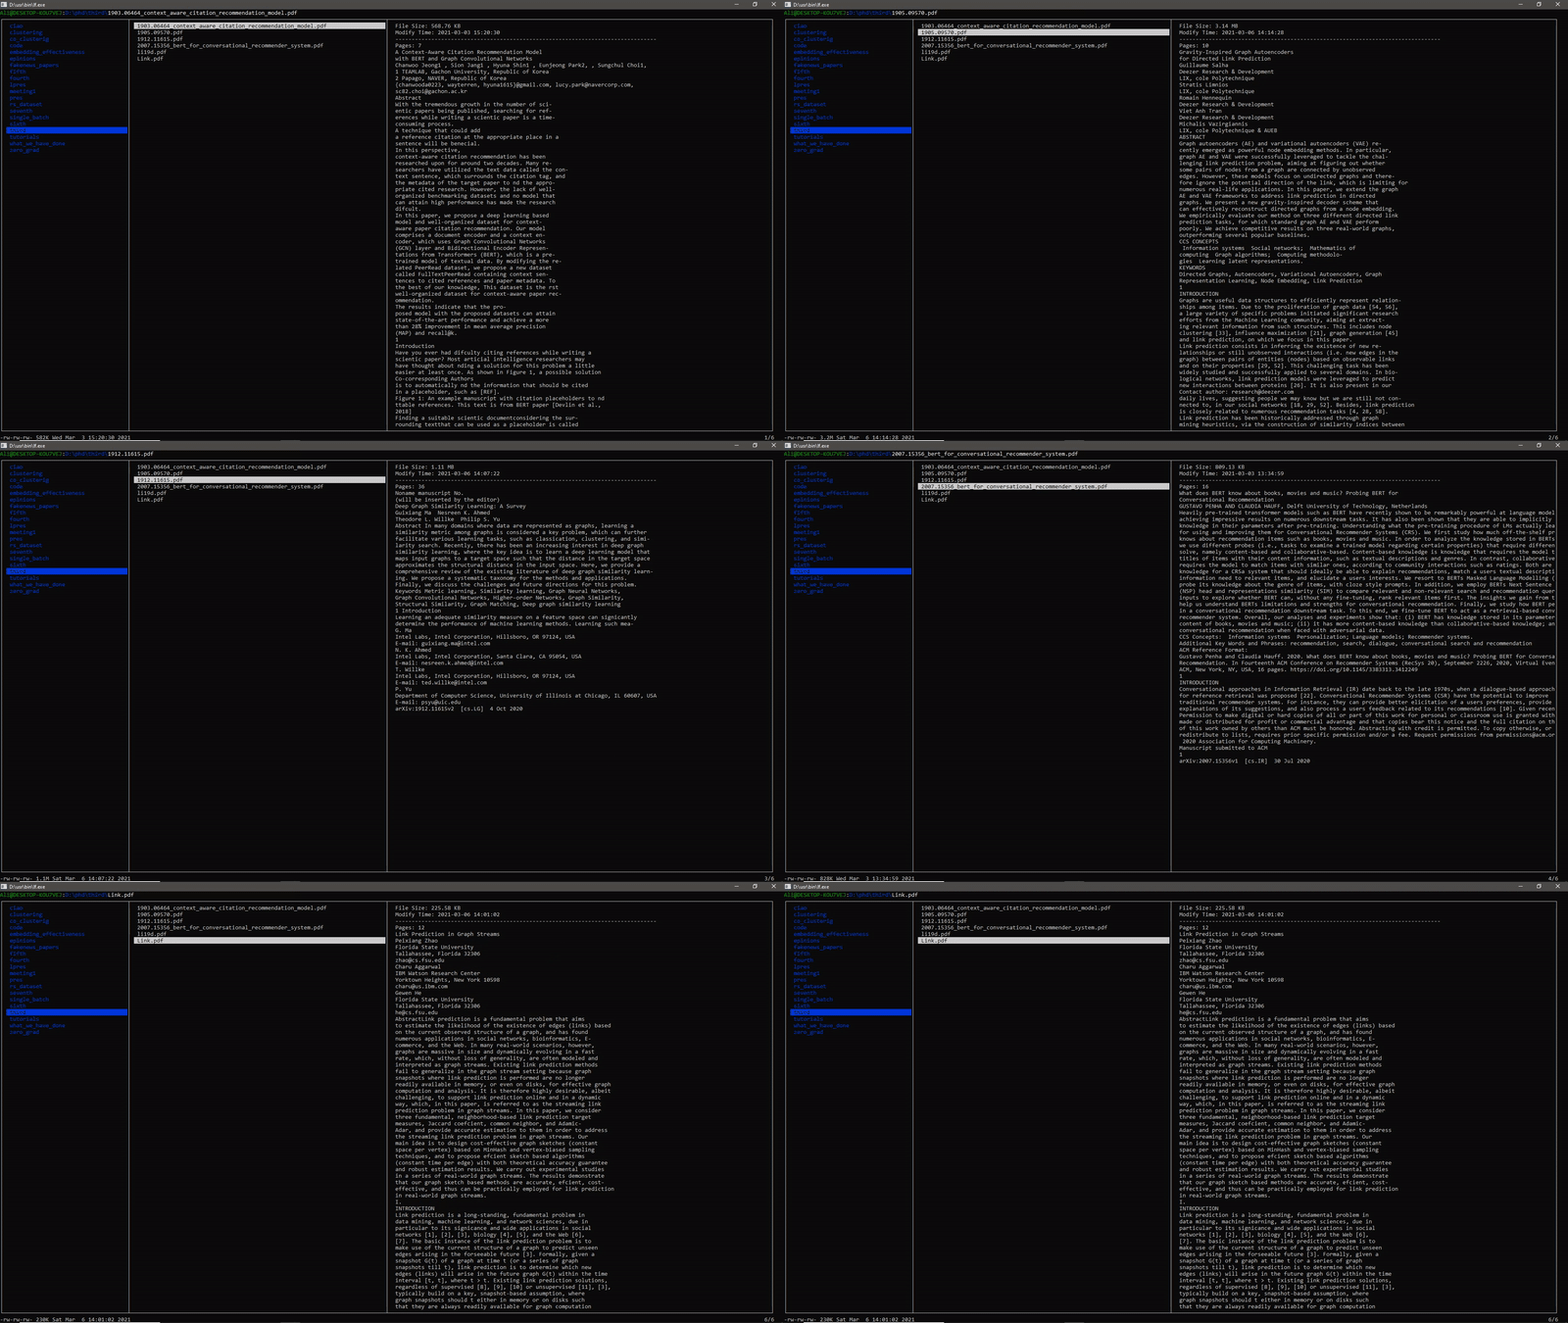
<p>It looks like this:</p>

<p><img src="https://cdn-images-1.medium.com/max/2000/1*D6Z7V-GwHeVEJg8euEYdKg.gif" alt="PDF file preview" /></p>

<p>In order to activate it, you need to download <a href="https://github.com/ahrm/dotfiles/blob/main/lf-windows/lf_scripts/lf_preview.py">lf_preview.py</a> and <a href="https://github.com/ahrm/dotfiles/blob/main/lf-windows/lf_scripts/preview.bat">preview.bat</a> and add the following to your <code class="language-plaintext highlighter-rouge">lfrc</code>.</p>

<div class="language-plaintext highlighter-rouge"><div class="highlight"><pre class="highlight"><code># custom file preview
set previewer "D:\\lf_scripts\\preview.bat"
</code></pre></div></div>]]></content><author><name></name></author><category term="jekyll" /><category term="update" /><summary type="html"><![CDATA[]]></summary></entry></feed>